
Rain of Fire
Overview
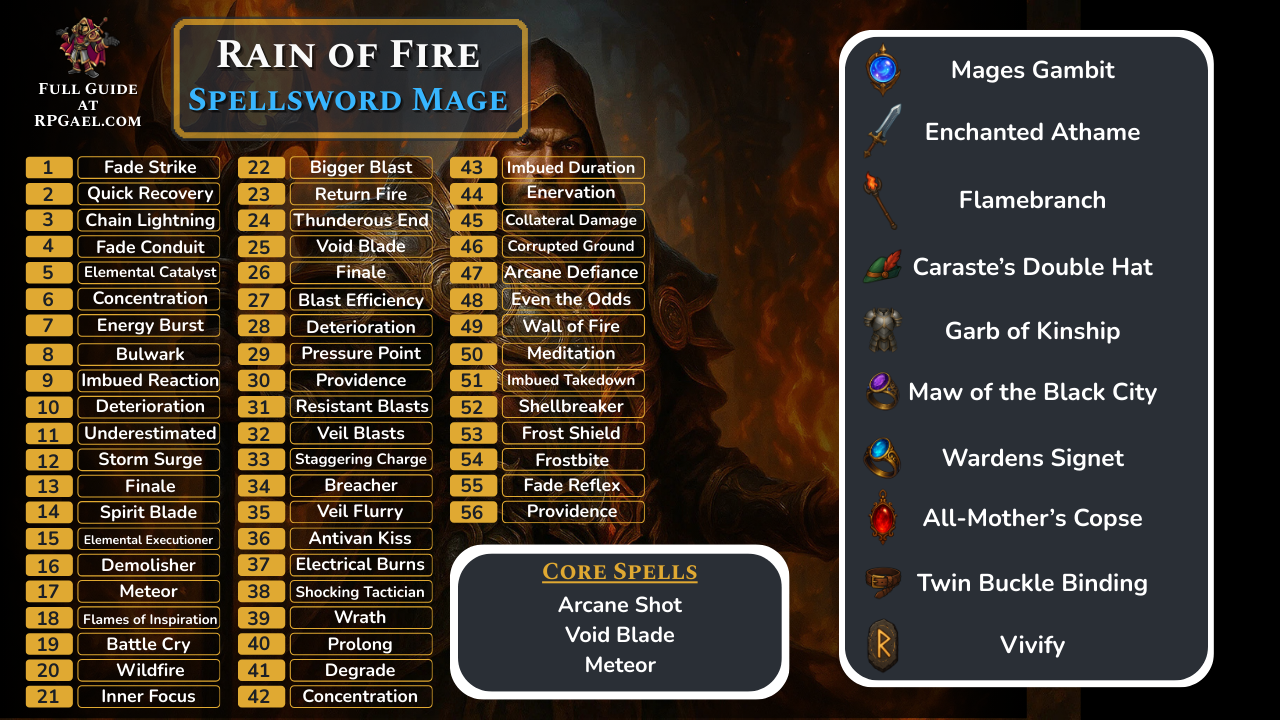
The Rain of Fire Spellblade Mage is the strongest and most explosive build in Dragon Age: The Veilguard. It takes a class that struggles early and transforms it into a late-game monster that can melt bosses, clear mobs instantly, and sustain itself indefinitely. The entire concept revolves around chaining three blast abilities — Arcane Shot, Meteor, and Void Blade — into an endless cycle of critical hits, mana refunds, and self-healing. Once the legendary gear set comes together, you effectively become unkillable while deleting everything on screen.
What makes this build stand out is its synergy with fire damage. Fire is the best element in the game, tearing through both armored enemies and darkspawn, which happen to be the most common threats you’ll face. Combined with the passive package from the Spellblade tree and the infamous Maw of the Black City + Garb of Kinship interaction, the build has both absurd damage scaling and infinite sustain. Instead of worrying about positioning or cooldowns, you simply rotate blasts, crit endlessly, and watch the battlefield evaporate in flames.
This is not just another strong build — it’s a top-tier powerhouse designed for players who want to dominate nightmare difficulty with minimal stress. If you like overwhelming damage, constant screen-wide explosions, and a self-sustaining playstyle that borders on autopilot, the Rain of Fire Mage is the definitive way to play.

Early Game
Mage starts rough compared to rogue/warrior, so be cautious until your specialization comes in.
For faction, pick what you like; Shadow Dragons (mana regen) or Mourn Watch (affliction power) both help, but story/lore preference is fine.
The play pattern is to skip the beam early except to crack barriers—it’s a mana sink. If you prefer Orb & Dagger starts, use arcane bombs to prop up damage, but the spell core is what carries you:
- Arcane Shot — your day-one to endgame button. It fires five burning projectiles and is almost always your best mana spend early.
- Storm Surge — quick line strike plus backstep that applies Overwhelm. It’s here because it doesn’t cost mana and lets you start proccing lightning→fire chains. This gets replaced later.
- Meteor — your AoE spell. Grouped mobs = Meteor. Lone priority target = Arcane Shot.
A couple passives matter even now. Energy Burst rewards alternating lightning and fire (Storm Surge into Arcane Shot/Meteor). Spirit Blade is just an early crutch: it tidies up your basic chain and lets you detonate safely at range but you’ll stop caring about it once the spell loop is online.
Early Levels
|
Level |
Spell/Passive |
|---|---|
|
1 |
Fade Strike |
|
2 |
Quick Recovery |
|
3 |
Chain Lightning |
|
4 |
Fade Conduit |
|
5 |
Elemental Catalyst |
|
6 |
Concentration |
|
7 |
Energy Burst |
|
8 |
Bulwark |
|
9 |
Imbued Reaction |
|
10 |
Deterioration |
|
11 |
Underestimated |
|
12 |
Storm Surge |
|
13 |
Finale |
|
14 |
Spirit Blade |
|
15 |
Elemental Executioner |
|
16 |
Demolisher |
|
17 |
Meteor |
|
18 |
Flames of Inspiration |
|
19 |
Battle Cry |
|
20 |
Wildfire |
|
21 |
Inner Focus |
|
22 |
Bigger Blast |
|
23 |
Return Fire |
|
24 |
Thunderous End |
|
25 |
Void Blade |
|
26 |
Finale |
|
27 |
Blast Efficiency |
|
28 |
Deterioration |
|
29 |
Pressure Point |
|
30 |
Providence |
Equipment
|
Item |
Details |
|---|---|
|
Primary Weapon Mages Gambit |
Provides +15% bonus damage and additional status effects |
|
Secondary Weapon  Enchanted Athame |
More then doubles your damage at the cost of additional mana |
|
Staff  Flamebranch |
Additional fire damage and mana resource |
|
Helmet  Caraste’s Double Hat |
Provides +30% damage from having all blast abilities and refunds 25% of mana cost on impact |
|
Armor  Garb of Kinship |
The best armor piece in The Veilguard, provides longer advantage duration, +10% damage for EVERY advantage (you will typically always have 3+), makes the advantages more effective and most importantly heals you for +5% when gaining an advantage which will offset the self damage of Maw of the Black City |
|
Ring 1  Maw of the Black City |
Makes your abilities a guaranteed critical hit at the cost of our health, this issue is completely negated by Garb of Kinship & Twin Buckle Binding |
|
Ring 2  Wardens Signet |
Extra Fire Damage |
|
Amulet  All-Mothers Copse |
Significant boosts to our blast ability damage and returns our mana when critical hitting with blast abilities, working in perfect combination with Maw of the Black City |
|
Belt  Twin Buckle Binding |
Extra healing and ability damage |
|
Rune 1  Vivify |
Ability cooldowns are refreshed and the next ability is free |
|
Rune 2 Escalate |
Passive +10% Ability damage |
|
Rune 3 Scorch |
Passive +10% Fire damage |
Equipment Overview
The entire build revolves around a four-piece synergy package that I like to call Exodia: Caraste’s Double Hat, All-Mother’s Copse, Garb of Kinship, and Maw of the Black City. Once you have these four legendaries, the build essentially plays itself and your only job is to rotate abilities.
- Caraste’s Double Hat gives a massive 30% damage boost when all three of your abilities share the same type. Since Arcane Shot, Meteor, and Void Blade are all blast spells, the Hat is always active.
- All-Mother’s Copse refunds 25 mana every critical blast, which is crucial for sustaining infinite chains.
- Maw of the Black City ensures every ability crits, turning those refunds from All-Mother’s into an endless loop of resources.
- Garb of Kinship closes the loop by healing you through advantages and stacking a constant 40%+ damage boost. This piece completely offsets Maw’s self-damage and makes the entire engine possible.
Together, these items create a cycle where every blast is a critical hit, every crit restores mana, and every cast heals and buffs you — meaning you never run dry, never go down, and your damage only climbs higher the longer a fight goes.
Outside of the core, weapons exist mostly to reinforce the burn. Mage’s Gambit and Flame Branch both stack more fire and electric damage, while Enchanted Athame is the late-game nuke stick, pushing your raw output through the roof once you have the regen to sustain it. Rings like Warden Signet and Graven Opal are just padding extra multipliers on top of an already broken kit.
The big takeaway is that equipment here isn’t about slot-by-slot optimization it’s about assembling the four legendary pieces that turn the build from “very strong” into “literally unkillable with infinite damage.” Everything else is just seasoning.
How to Play Late Game
Once the core passives unlock, the build fully comes online and the rotation becomes simple. Blast Efficiency is the keystone that makes everything work, cutting the mana cost of Arcane Shot, Meteor, and Void Blade in half so you can chain them infinitely. From there, the advantage package keeps you alive and stacked with damage at all times. Pressure Point grants Quickened through constant crits, Flames of Inspiration rewards you with Rally Party for killing burning enemies (which happens constantly), Resistant Blast hands you free mitigation on every kill, and Zone of Destruction adds even more burst when you line up groups for Meteor. The last piece, Imbued Duration, is especially important — detonating an enemy at the start of each fight ensures you always have Shocking Weapons active, massively amplifying Void Blade and tying the whole engine together.
The loop is almost brainless. Start by detonating something to trigger Shocking Weapons, it can be you or your companions it does not matter. If enemies are clustered, drop Meteor first, then follow with Arcane Shot and Void Blade. If they’re spread, lead with Arcane Shot to stabilize mana and pick targets off. The order doesn’t matter as much as simply cycling one after another so your mana never dips. Arcane Shot in particular should show up every few casts, it is a multi-hit so it refunds the most resources through All-Mother’s Copse. The only real danger in this build is missing too many targets and falling out of rhythm, so keep Vivify or your ultimate in reserve to reset. Otherwise, every fight turns into an endless loop of crits, burns, and explosions until nothing is left standing.
The playstyle can almost feel unfair. By chaining blast after blast, you cover the screen in fire, erase even armored or darkspawn bosses within seconds, and heal back whatever chip damage Maw of the Black City tries to inflict. You don’t need fancy combos or tight execution, just detonate, cast, and repeat until the credits roll.
Check the links below to browse more of the Best Builds for Dragon Age: The Veilguard!
Final Levels
|
Level |
Spell/Passive |
|---|---|
|
31 |
Resistant Blasts |
|
32 |
Veil Blasts |
|
33 |
Staggering Charge |
|
34 |
Staggering Charge |
|
35 |
Veil Flurry |
|
36 |
Antivan Kiss |
|
37 |
Electrical Burns |
|
38 |
Shocking Tactician |
|
39 |
Wrath |
|
40 |
Prolong |
|
41 |
Degrade |
|
42 |
Concentration |
|
43 |
Imbued Duration |
|
44 |
Enervation |
|
45 |
Collateral Damage |
|
46 |
Corrupted Ground |
|
47 |
Arcane Defiance |
|
48 |
Even the Odds |
|
49 |
Wall of Fire |
|
50 |
Meditation |
|
51 |
Imbued Takedown |
|
52 |
Shellbreaker |
|
53 |
Frost Shield |
|
54 |
Frostbite |
|
55 |
Fade Reflex |
|
56 |
Providence |
|
57 |
Zone of Destruction |
|
58 |
Necessary Steps |
|
59 |
Breathing Room |
|
60 |
Perfect Cast |
|
61 |
Wrath |
|
62 |
Reclamation |
|
63 |
Amperage |
|
64 |
Tempest |
|
65 |
Frost Nova |
- Every ability node is an extra 15% passive damage so we want to grab as many abilities as possible even if we are not using them
Build Snapshot
Related Builds


Support the Website
Thank you for choosing RPGael!
RPGael is kept ad-free so you can enjoy builds without distractions. If you’d like to support the site, you can donate through Ko-fi or check out the RedGael YouTube channel. Every bit of support helps keeps new content coming!

