
Lord of Flame
Overview
The Lord of Flame is one of the most complete and rewarding builds in Dragon Age: The Veilguard. It’s not the most overpowered setup in the game, but it strikes an incredible balance between power, versatility, and fun. With this build you’ll parry enemy attacks, knock squads flat with Titan Stomp, burn them alive with Blight Bane and Deadly Ground, and finish with devastating sword and shield strikes.
What makes it special is how well it combines every system in the game: parries, stagger, detonations, shield attacks, flame bonuses, and raw melee damage. It plays fast and punishes mistakes with high risk–high reward mechanics, but even if you aren’t a parry expert, the Champion’s natural tankiness keeps you alive. Once the flaming weapons are active, you tear through hordes in seconds, rewarding both skillful timing and brute force aggression.
The Lord of Flame isn’t just strong — it’s stylish. If you want a build that rewards precision, makes you feel like a juggernaut surrounded in fire, and still clears nightmare difficulty with ease, this is one of the best Warrior options in the game.

Early Game
For character creation, Grey Wardens are a natural fit. Their defensive perks help in the early game, and the roleplay value of a Grey Warden Champion fits the story perfectly. Other origins are fine, but Wardens feel thematically right.
Warriors have the best early game of any class thanks to reliable crowd control, durability, and consistent damage. Even if you miss parries, you’re tanky enough to survive, making this a forgiving entry into melee builds.
Your main abilities in the early levels are Titan Stomp, Grappling Spear, and Driving Kick. Titan Stomp is the star — a huge AoE slam that doesn’t consume rage, letting you knock down enemies and punish them freely. Grappling Spear yanks pesky backline mages or archers straight into your shield bash range. Driving Kick is more for fun, punting enemies off ledges, but it’s cheap at one rage bar and surprisingly effective.
Important passives include Shield Volley, which lets you bounce your shield multiple times on heavy attack; Return to Sender, which allows perfect defense to reflect projectiles; and Fiery Resolve, which keeps flaming weapons active either through detonations or perfect defenses. Add Unbroken Finale, which grants a powerful shield finisher at the end of attack chains, and you already have the backbone of the Lord of Flame before specialization even unlocks.
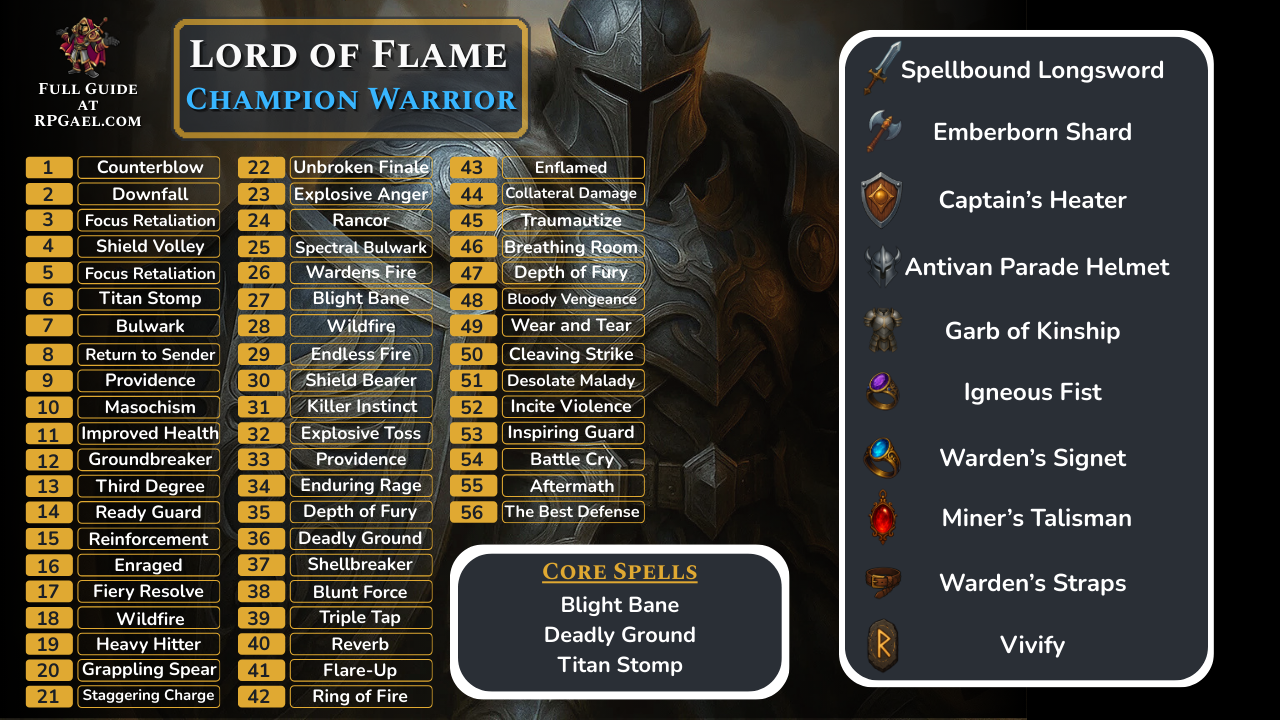
Early Levels
|
Level |
Spell/Passive |
|---|---|
|
1 |
Counterblow |
|
2 |
Downfall |
|
3 |
Focus Retaliation |
|
4 |
Shield Volley |
|
5 |
Focus Retaliation |
|
6 |
Titan Stomp |
|
7 |
Bulwark |
|
8 |
Return to Sender |
|
9 |
Providence |
|
10 |
Masochism |
|
11 |
Improved Health |
|
12 |
Groundbreaker |
|
13 |
Third Degree |
|
14 |
Ready Guard |
|
15 |
Reinforcement |
|
16 |
Enraged |
|
17 |
Fiery Resolve |
|
18 |
Wildfire |
|
19 |
Heavy Hitter |
|
20 |
Grappling Spear |
|
21 |
Staggering Charge |
|
22 |
Unbroken Finale |
|
23 |
Explosive Anger |
|
24 |
Rancor |
|
25 |
Spectral Bulwark |
|
26 |
Wardens Fire |
|
27 |
Blight Bane |
|
28 |
Wildfire |
|
29 |
Endless Fire |
|
30 |
Shield Bearer |
Equipment
|
Item |
Details |
|---|---|
|
Primary Weapon  Spellbound Longsword |
Provides +15% bonus damage and additional status effects |
|
Secondary Weapon  Emberborn Shard |
More then doubles your damage at the cost of additional mana |
|
Shield  Captain’s Heater |
Additional fire damage and mana resource |
|
Helmet Caraste’s Double Hat/Antivan Parade Helmet |
Provides +30% damage from having all blast abilities and refunds 25% of mana cost on impact |
|
Armor  Garb of Kinship |
The best armor piece in The Veilguard, provides longer advantage duration, +10% damage for EVERY advantage (you will typically always have 3+), makes the advantages more effective and most importantly heals you for +5% when gaining an advantage which will offset the self damage of Maw of the Black City |
|
Ring 1  Igneous Fist |
Makes your abilities a guaranteed critical hit at the cost of our health, this issue is completely negated by Garb of Kinship & Twin Buckle Binding |
|
Ring 2  Warden’s Signet |
Extra Fire Damage |
|
Amulet  Miner’s Talisman |
Significant boosts to our blast ability damage and returns our mana when critical hitting with blast abilities, working in perfect combination with Maw of the Black City |
|
Belt  Warden’s Straps |
Extra healing and ability damage |
|
Rune 1  Vivify |
Ability cooldowns are refreshed and the next ability is free |
|
Rune 2 Escalate |
Passive +10% Ability damage |
|
Rune 3 Scorch |
Passive +10% Fire damage |
Equipment Overview
The armor core of this build is anchored by Garb of Kinship, which is simply unrivaled in keeping you alive while amplifying your damage. Its constant healing and 30–40% bonus damage while advantages are active turns the Maw of the Black City’s self-damage from a liability into free power. Combined with Karast’s Double Hat, which refunds mana and adds a hefty boost to all blast abilities, the build’s chain casting becomes sustainable. The All-Mother’s Copse amulet ties it together by returning mana on every critical blast, ensuring your rotation never slows. Rings like Maw of the Black City and Warden Signet round things out, the first pushing crits on every cast and the second layering more raw fire damage to fuel the burning playstyle.
On the weapon side, the standout pieces are Mage’s Gambit, Enchanted Aame, and Flame Branch. Gambit and Flame Branch are straightforward damage boosts to fire and lightning, which you’ll be chaining constantly, while Enchanted Aame becomes absurd once mana regeneration is secured through Kinship and Copse. With these three in play, every blast spell hits harder, crits more often, and loops mana back into your bar, creating a closed system where offense and sustain are one and the same.
How to Play Late Game
Once you unlock Champion specialization, the build evolves into a devastating firestorm. Swap Driving Kick for Blight Bane, a ranged fire bomb that explodes in a large AoE and scales brutally with passives. Pair it with Deadly Ground, which now deals fire damage thanks to Champion’s passive boosts, and enemies are forced to burn inside your area control. Keep Titan Stomp as the backbone ability, pinning everything down so your fire zones chew them apart.
The ultimate choice is Flashing Fists rather than Warden’s Fire. It’s reliable, satisfying, and knocks enemies off ledges when needed, while still dealing big damage. Endgame passives like Inspiring Guard are critical, letting you block even “unblockable” red attacks and gain Rally Party in the process. With this, virtually nothing can break through your defenses.
A typical fight looks like this: start by detonating an enemy to activate flaming weapons. Leap into the fray, cast Titan Stomp and immediately drop Deadly Ground. Build rage quickly and throw Blight Bane to engulf the battlefield in flames. Use Vivify to reset cooldowns and repeat — often allowing six abilities to fire off in under six seconds, wiping most groups instantly. While cycling abilities, parry attacks to stay invulnerable, punish with sword chains boosted by Unbroken Finale, and keep flaming weapons active through constant detonations.
The end result is a build that feels flexible but always explosive. You can win with parries, raw weapon swings, Afflictions, or just fire AoE spam. However you approach it, the Lord of Flame rewards aggressive play and precise timing, giving you one of the most complete Warrior experiences in the game.
Final Levels
|
Level |
Spell/Passive |
|---|---|
|
31 |
Killer Instinct |
|
32 |
Explosive Toss |
|
33 |
Providence |
|
34 |
Enduring Rage |
|
35 |
Depth of Fury |
|
36 |
Deadly Ground |
|
37 |
Shellbreaker |
|
38 |
Blunt Force |
|
39 |
Triple Tap |
|
40 |
Reverb |
|
41 |
Flare-Up |
|
42 |
Ring of Fire |
|
43 |
Enflamed |
|
44 |
Collateral Damage |
|
45 |
Traumautize |
|
46 |
Breathing Room |
|
47 |
Depth of Fury |
|
48 |
Bloody Vengeance |
|
49 |
Wear and Tear |
|
50 |
Cleaving Strike |
|
51 |
Desolate Malady |
|
52 |
Incite Violence |
|
53 |
Inspiring Guard |
|
54 |
Battle Cry |
|
55 |
Aftermath |
|
56 |
The Best Defense |
|
57 |
Wrath |
|
58 |
Dazzle |
|
59 |
Underestimated |
|
60 |
Breathing Room |
|
61 |
Fortifying Shots |
|
62 |
Reinforced |
|
63 |
Good Arm |
|
64 |
Refract |
|
65 |
Battlefield Awareness |
- Every ability node is an extra 15% passive damage so we want to grab as many abilities as possible even if we are not using them
Build Snapshot
Related Builds
Support the Website
Thank you for choosing RPGael!
RPGael is kept ad-free so you can enjoy builds without distractions. If you’d like to support the site, you can donate through Ko-fi or check out the RedGael YouTube channel. Every bit of support helps keeps new content coming!

