
The Chosen
Overview
The Templar is my favorite warrior specialization in Dragon Age Inquisition, and for good reason. It’s a build that blends high survivability, team support, and one of the most devastating combos in the entire game: Wrath of Heaven into Spell Purge. With this setup, you’re not just a frontline fighter—you’re a holy executioner who can wipe out groups of enemies in a single move. On Nightmare, the combination of damage, utility, and durability makes this one of the safest and most satisfying warrior builds available.
This guide is built and tested for Nightmare difficulty, but it works just as well on Hard or Normal if you’re looking for a powerful but accessible setup.
Early Game
Warriors start the game fairly strong compared to Rogues and Mages thanks to their utility, crowd control, and natural durability. The early focus is keeping enemies under control and protecting your team until you acquire the Templar specialization.
The two most important abilities early are Mighty Blow and Grappling Chain. Mighty Blow is the bread-and-butter two-handed attack you begin with—it knocks enemies down and deals solid damage, making it useful for both control and burst. Grappling Chain pulls mages and archers out of the backline so you can eliminate them quickly. This pairing gives you tools to handle high-priority targets right away.
Pommel Strike is another key pickup. Shield-bearing enemies can be a nightmare for melee builds, and Pommel Strike stuns through their defenses. Early on, this move helps you maintain tempo so you don’t get bogged down.
The last early game ability worth highlighting is Horn of Valor. This is one of the best utility abilities in the game, boosting your team’s damage and armor. Once upgraded, it also grants guard on hit, which makes it invaluable for survival. If you’re confident in your defenses, you can instead upgrade it for even more offensive output. Either way, use this ability before every engagement and whenever it comes off cooldown—it’s that good.
For early equipment, crafting is your best option. Prioritize armor that offers Constitution and Strength to survive the harder fights, and fill utility slots with defensive bonuses. The early game is the hardest stretch for this build, so don’t be afraid to lean on tankier setups until the specialization unlocks.
Early Levels
|
Level |
Spell/Passive |
|---|---|
|
1 |
Counterblow |
|
2 |
Downfall |
|
3 |
Focus Retaliation |
|
4 |
Shield Volley |
|
5 |
Focus Retaliation |
|
6 |
Titan Stomp |
|
7 |
Bulwark |
|
8 |
Return to Sender |
|
9 |
|
|
10 |
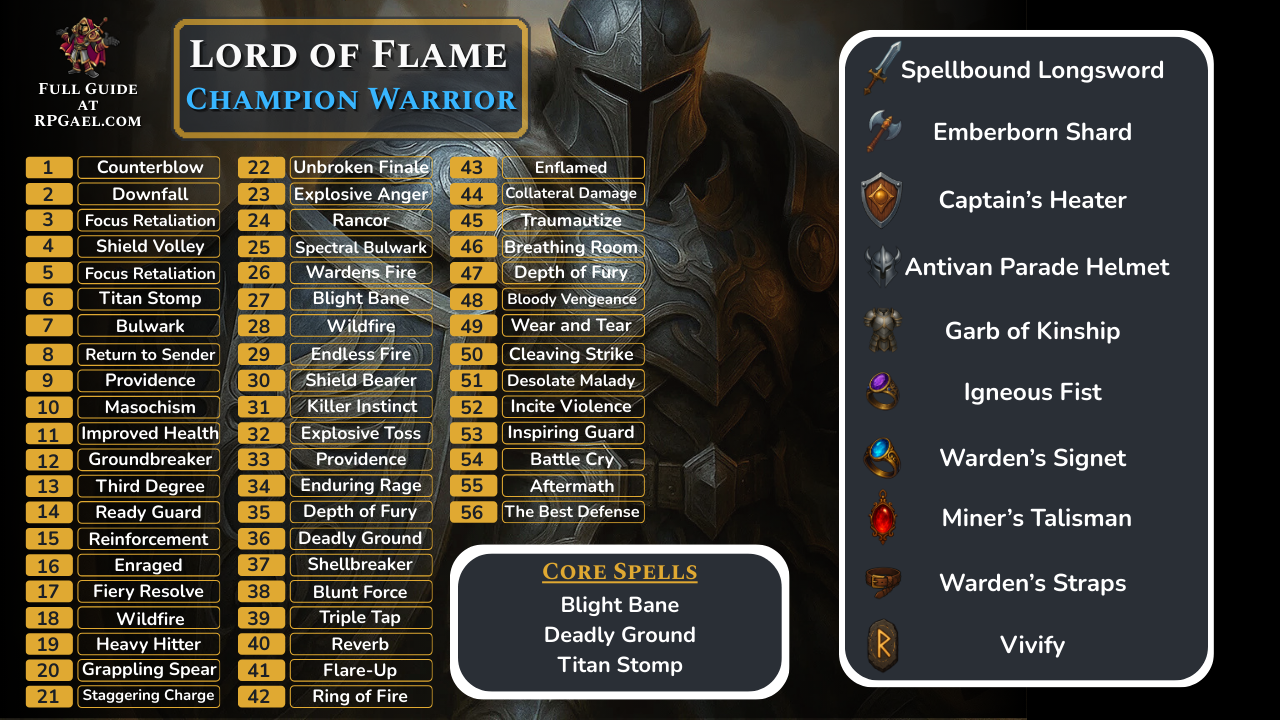
Equipment
|
Item |
Details |
|---|---|
|
Primary Weapon  Spellbound Longsword |
Provides +15% bonus damage and additional status effects |
|
Helmet  Emberborn Shard |
More then doubles your damage at the cost of additional mana |
|
Armor  Captain’s Heater |
Additional fire damage and mana resource |
|
Gloves Caraste’s Double Hat/Antivan Parade Helmet |
Provides +30% damage from having all blast abilities and refunds 25% of mana cost on impact |
|
Boots  Garb of Kinship |
The best armor piece in The Veilguard, provides longer advantage duration, +10% damage for EVERY advantage (you will typically always have 3+), makes the advantages more effective and most importantly heals you for +5% when gaining an advantage which will offset the self damage of Maw of the Black City |
|
Ring 1  Igneous Fist |
Makes your abilities a guaranteed critical hit at the cost of our health, this issue is completely negated by Garb of Kinship & Twin Buckle Binding |
|
Ring 2  Warden’s Signet |
Extra Fire Damage |
|
Amulet  Miner’s Talisman |
Significant boosts to our blast ability damage and returns our mana when critical hitting with blast abilities, working in perfect combination with Maw of the Black City |
|
Belt  Warden’s Straps |
Extra healing and ability damage |
Equipment Overview
For armor, the ideal setup is a Superior Skirmisher Hat paired with The Skin That Strikes. This combination provides plenty of utility and offensive slots, letting you stack critical chance and critical damage to maximize the burst from your Wrath + Purge combo. Early on you can slot more Constitution and Strength for survivability, but late game you’ll want to go all-in on offensive stats.
Your best weapon is the Chromatic Greatsword, which combines top-tier base damage with elemental effects that further scale your output. If you dislike its appearance, the Axe of the Dragon Hunter from the Black Emporium is a strong alternative that fits the build thematically and mechanically.
Accessories are less flashy but equally important. Rings that boost critical chance or critical damage scale perfectly with this setup, while amulets such as the Amulet of Strength or Amulet of Power (Templar) accelerate your progression. For belts, defensive options like the Belt of Guarding can help you stay alive on Nightmare. Finally, use Fade-Touched materials (Obsidian, Lambswool, or Gurgut Skin) when crafting—Guard on Hit is essential to keeping yourself alive during extended fights.
How to Play Late Game
Once you reach Skyhold and complete the specialization quest, Templar comes online—and this is where the build transforms. The Templar skill tree offers unique abilities that amplify both personal damage and party support, but the heart of the build lies in its devastating combo.
Wrath of Heaven is the centerpiece. This ability calls down a pillar of light that stuns enemies and deals heavy damage to demons. On its own, it’s already one of the most satisfying moves in the game, capable of one-shotting most demonic enemies outright. But the true strength of Wrath of Heaven comes when paired with Spell Purge.
Spell Purge detonates incapacitated enemies, dealing massive spirit damage in an area. Wrath of Heaven provides the stun, and Spell Purge provides the detonation. Together, they create a combo that can wipe entire groups of enemies instantly, regardless of type. Demons get obliterated by Wrath of Heaven alone, but against humans and beasts, chaining it into Spell Purge unleashes some of the highest burst damage possible in the game.
Another important tool is Charging Bull (upgraded into Gore and Trample). This provides free mobility, generates guard, and costs no stamina when upgraded, making it the perfect setup ability before unleashing Wrath of Heaven. It also helps keep you on top of priority targets without sacrificing damage.
Finally, Blessed Blades is your main buffing ability. It increases the damage of you and your allies, and depending on the upgrade you choose, it can either reduce cooldowns for your combo or extend its benefits to allies who leave the aura. Paired with Horn of Valor, this makes you a powerhouse support while still dealing incredible damage yourself.The Templar build is all about cycling through control, setup, and execution while maintaining guard to stay alive. Here’s how a typical fight plays out:
- Open with Charging Bull to dive into the fray, knock enemies down, and generate guard.
- Activate Horn of Valor and Blessed Blades to buff your team and prepare for the burst.
- Cast Wrath of Heaven to stun a group of enemies.
- Immediately follow with Spell Purge to detonate the stun, wiping out everything in the radius.
That sequence alone will clear most fights against regular enemies. Against tougher targets, you’ll still rely on the Wrath + Purge combo for burst, but you’ll mix in Mighty Blow and Pommel Strike for additional control, while maintaining buffs and guard generation.
One advanced tip: Spell Purge is also a dispel ability. This means you can cast it on Rift spawn points to eliminate up to two enemies before they even appear. It’s an excellent way to trivialize Rift encounters and makes the Templar feel like the true anti-demon specialist it’s meant to be.
In tougher encounters, timing your combo is crucial. Wrath of Heaven has a hefty stamina cost, so use Charging Bull beforehand to ensure you can afford to cast it. If you ever feel overwhelmed, fall back on Horn of Valor’s guard generation and buy yourself time until Wrath comes back off cooldown.
The overall playstyle is fast, satisfying, and cinematic. You’re constantly diving into groups, blasting them with holy light, and rolling into the next pack without slowing down. On Nightmare difficulty, the ability to control the pace of battle while still dishing out incredible damage is what makes this build shine.
Final Levels
|
Level |
Spell/Passive |
|---|---|
|
11 |
Killer Instinct |
|
12 |
Explosive Toss |
|
13 |
Providence |
|
14 |
Enduring Rage |
|
15 |
Depth of Fury |
|
16 |
Deadly Ground |
|
17 |
Shellbreaker |
|
18 |
Blunt Force |
|
19 |
Triple Tap |
|
20 |
Reverb |
|
21 |
Flare-Up |
|
22 |
|
|
23 |
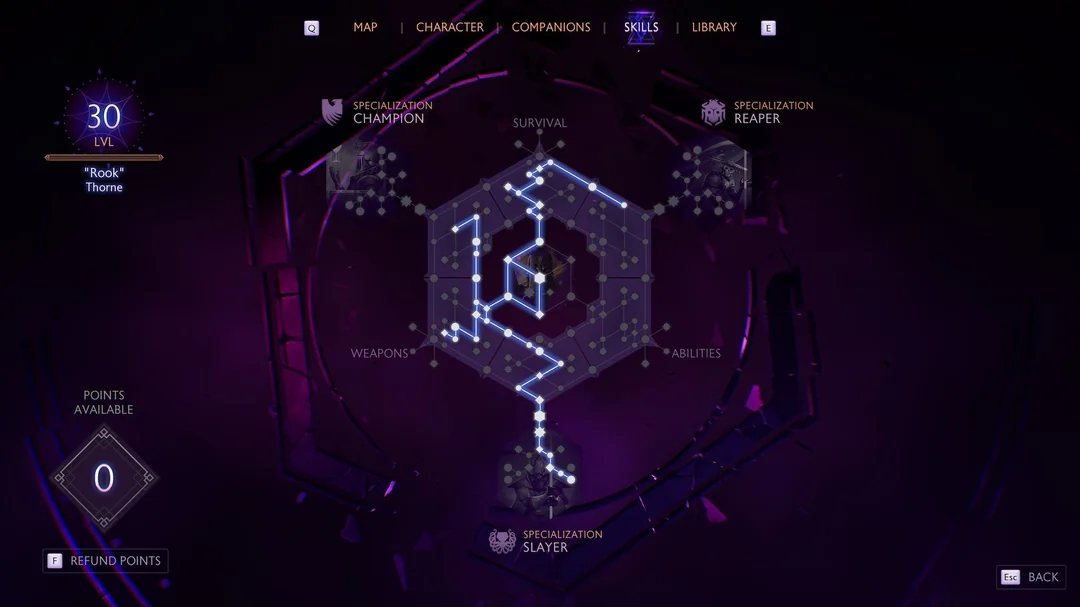
Build Snapshot
Related Builds
Support the Website
Thank you for choosing RPGael!
RPGael is kept ad-free so you can enjoy builds without distractions. If you’d like to support the site, you can donate through Ko-fi or check out the RedGael YouTube channel. Every bit of support helps keeps new content coming!

