

Berserker Verso
Overview
Berserker Verso is a brutal alternative to the more common machine-gun style. Instead of stacking free-aim shots forever, this build turns Verso into a glass cannon who thrives on living at one health and outputting massive ability damage. It’s high-risk, high-reward, but it scales much faster than his perfection-focused builds and requires far less Lumina investment. You can start using this setup as soon as you recruit Verso in Act 2, and he’ll immediately carry fights with some of the hardest-hitting abilities in the game.
The tradeoff is obvious: you’ll constantly be one mistake away from death. Parries, dodges, and good positioning become essential. But that tension is part of the fun. The payoff for managing it properly is absurd burst damage, versatile breaking tools, and a kit that can delete both mobs and bosses in a few turns.
Act 1 & 2
Verso’s unique perfection system naturally rewards aggression. Every attack climbs him closer to S-rank, while every hit he takes drops it back down. Normally, the goal is to keep attacking and avoid damage until he’s glowing with that 200% S-rank bonus. Berserker flips that script. Instead of slowly ramping up, this build uses tools that instantly launch him into high rank while also cutting his health to maximize his damage multipliers.
The foundation of the build is Berserk Slash, which scales harder the lower his HP gets. Paired with Overload, which drops him straight to one health while granting full AP and boosting rank to A, you’ve got a devastating opener that turns him into a one-man wrecking crew. Defiant Strike adds consistency by spending 30% HP to apply a mark and deal solid damage — marks boost the next attack by 50%, giving both Verso and his allies free multipliers.
For utility, Blitz carries the early game with cheap executes and bonus turns. Phantom Stars is mandatory for AoE and breaking, letting Verso clear groups as efficiently as he chunks bosses. And while Radiant Slash isn’t a centerpiece, it’s a cheap breaking tool that fills gaps when you need quick control.
The early combat flow is straightforward. Use Overload or Defiant Strike to cut your HP and spike rank. Follow up with Berserk Slash for single-target burst, or Phantom Stars when you want the field broken. Blitz provides tempo when you need extra actions, and Radiant Slash plugs holes in multi-target fights. With pictos like In Media Res and Solidifying adding shields at one health, the “suicidal” part of the build gets turned into a workable strategy.
Leveling
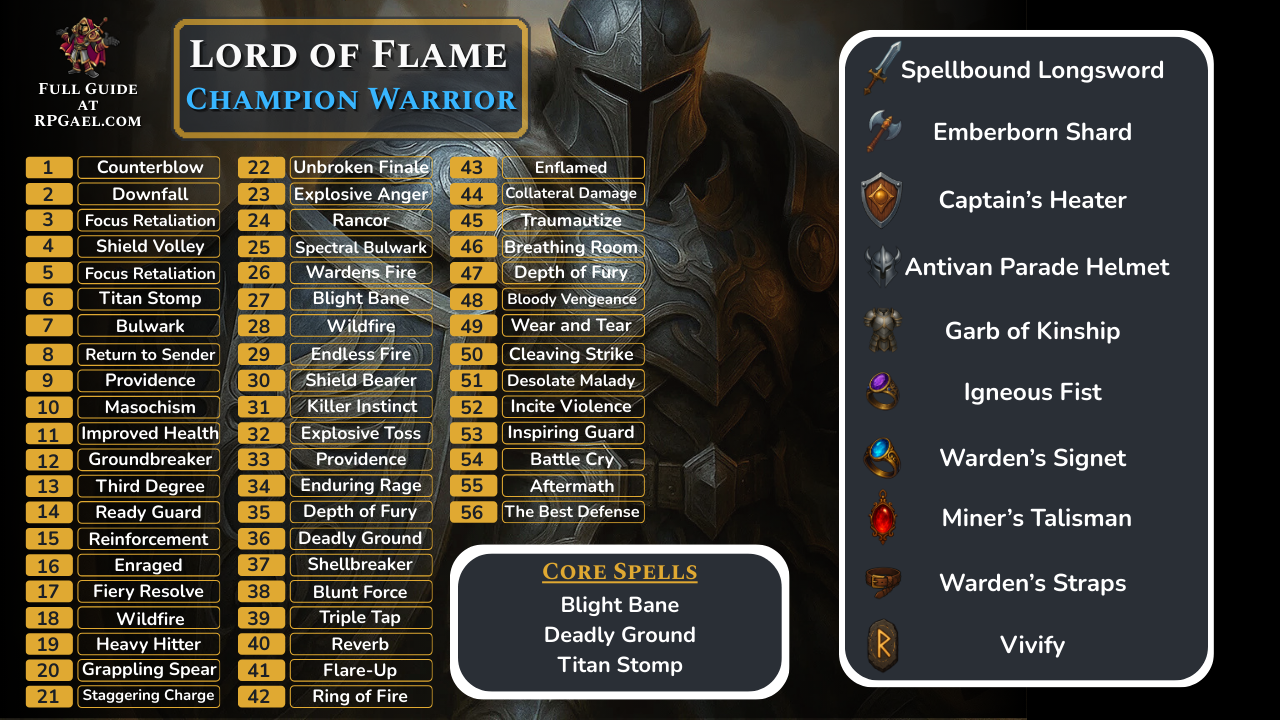
| Level </2449_d8964a-3d> | Spell/Passive </2449_7cdfba-20> |
|---|---|
| 1 </2449_61861b-a5> | Counterblow </2449_59a754-42> |
| 2 </2449_5b2ed3-4c> | Downfall </2449_480abc-84> |
| 3 </2449_7b2897-3b> | Focus Retaliation </2449_59d08a-83> |
| 4 </2449_97b2f5-4b> | Shield Volley </2449_30530a-dd> |
| 5 </2449_b5b33c-af> | Focus Retaliation </2449_82ad8d-20> |
| 6 </2449_ac33b1-e3> | Titan Stomp </2449_d01d26-12> |
| 7 </2449_4faf47-45> | Bulwark </2449_5f0532-dd> |
| 8 </2449_9b6a8f-0b> | Return to Sender </2449_69e054-41> |
| 9 </2449_d338e4-dc> | </2449_414d7e-f6> |
| 10 </2449_a60c9d-90> | </2449_7dbaf2-9e> |
| 11 </2449_2011ad-51> | </2449_24532c-e9> |
| 12 </2449_77dd72-13> | </2449_ed6f9c-5f> |
| 13 </2449_3c7b4f-87> | </2449_48d9c5-9f> |
| 14 </2449_5fc4e5-42> | </2449_5283f1-d1> |
| 15 </2449_01275f-f5> | </2449_f5600a-83> |
| 16 </2449_8789f2-c9> | </2449_5174a0-2a> |
| 17 </2449_f6cc54-e3> | </2449_0fa1b3-f7> |
Act 1 & 2 Pictos
| Picto </2449_2db8bf-c4> | Details </2449_f1d48c-02> |
|---|---|
| At Death’s Door </2449_b8613b-db> | Provides +15% bonus damage and additional status effects </2449_e18f83-32> |
| 2 </2449_c8484b-db> | More then doubles your damage at the cost of additional mana </2449_d5ee47-12> |
| 3 </2449_84bcf1-e7> | Additional fire damage and mana resource </2449_33a3fc-76> |
| 4 </2449_8f3f12-18> | Provides +30% damage from having all blast abilities and refunds 25% of mana cost on impact </2449_1b3b3e-01> |
| 5 </2449_f7bff4-6f> | </2449_40fb31-dc> |
| 6 </2449_d529a3-f2> | </2449_e9b6ad-ff> |
| 7 </2449_00fb72-97> | </2449_5f2ac3-90> |
| 8 </2449_eb9c39-6b> | </2449_e9c83e-57> |
| 9 </2449_cae18f-46> | </2449_c1d46b-4a> |
| 10 </2449_d5f9ee-c2> | </2449_aceec7-c1> |
| 11 </2449_182aca-dd> | </2449_1688a5-43> |
| 12 </2449_b7fba0-93> | </2449_f789ab-89> |
| 13 </2449_802d2a-2c> | </2449_464fd2-6a> |
| 14 </2449_b0f1e6-31> | </2449_1b1834-ae> |
| 15 </2449_dd6909-94> | </2449_d20ffb-11> |
| 16 </2449_bc9e91-02> | </2449_25bcd2-0c> |
| 17 </2449_6a61a4-8a> | </2449_fe10bb-cb> |
| 18 </2449_db3bc8-d1> | </2449_d41092-b6> |
| 19 </2449_b26001-4d> | </2449_74de78-03> |
| 20 </2449_850a8d-97> | </2449_9a08e5-02> |
| 21 </2449_6f089c-19> | </2449_eefd58-07> |
| 22 </2449_a4a78c-a5> | </2449_1766b7-b6> |
| 23 </2449_2925ac-be> | </2449_f6a012-b1> |
| 24 </2449_5341ac-3a> | </2449_303553-f6> |
| 25 </2449_aef8ca-a8> | </2449_dd8e2d-8f> |
| 26 </2449_72eec6-be> | </2449_213d67-e5> |
Weapons
| Item </2449_56175a-df> | Details </2449_8eeba0-69> |
|---|---|
| Weapon 1  Spellbound Longsword </2449_f6db37-c0> | Provides +15% bonus damage and additional status effects </2449_18da8d-30> |
| Weapon 2  Emberborn Shard </2449_065a25-dc> | More then doubles your damage at the cost of additional mana </2449_303deb-9c> |
| Weapon 3 Captain’s Heater </2449_d2a58b-96> | Additional fire damage and mana resource </2449_c449dd-0f> |
Weapons Overview
Early on, Blodam is the perfect fit. It guarantees S-rank from turn one, scaling with agility to let him strike first and strike hard. The synergy with Overload is incredible — you can skip the opener if you’re already low HP, since Blood handles rank boosting on its own.
In the late game, Blood still works, but there are stronger — and riskier — choices. Chevlin gives him even higher damage multipliers, but at the cost of disabling shields. For a one-HP build, that’s a terrifying gamble. Samoso, locked behind the hardest fight in the game, is another option. It grants invincibility as long as you keep your rank high, which this build excels at. Realistically, most players will stick with Blood throughout, as it’s reliable and easy to obtain.
For attributes, prioritize Agility first to scale with Blood and boost speed. Then push into Defense for weapon scaling and crit chance. Round things out with Might for a flat damage boost. Crit chance should always be managed to hit 50%, since the Critical Moment Picto adds the other 50% and caps you at guaranteed crits.
Final Pictos
| Picto </2449_f46014-e5> | Details </2449_f60f4a-52> |
|---|---|
| At Death’s Door </2449_332706-60> | Provides +15% bonus damage and additional status effects </2449_468209-38> |
| 2 </2449_0a046a-02> | More then doubles your damage at the cost of additional mana </2449_764e55-81> |
| 3 </2449_ca2bf3-a5> | Additional fire damage and mana resource </2449_fb2c32-b2> |
| 4 </2449_77c920-ee> | Provides +30% damage from having all blast abilities and refunds 25% of mana cost on impact </2449_48bdd9-d0> |
| 5 </2449_a7894f-0a> | </2449_5c7a40-2a> |
| 6 </2449_01f7aa-00> | </2449_c12b2d-98> |
| 7 </2449_3e7b9e-3d> | </2449_6a99c3-53> |
| 8 </2449_5af39b-98> | </2449_b3edab-53> |
| 9 </2449_28e448-0e> | </2449_165d90-e7> |
| 10 </2449_1bc0c5-4c> | </2449_94646b-fa> |
| 11 </2449_636d87-31> | </2449_11ac2e-e5> |
| 12 </2449_1b6047-42> | </2449_32e80f-00> |
| 13 </2449_0e4907-ed> | </2449_f741d8-46> |
| 14 </2449_dcef40-50> | </2449_ecfe8d-ef> |
| 15 </2449_d1eee3-24> | </2449_56f750-3b> |
| 16 </2449_43d288-d9> | </2449_a4790e-03> |
| 17 </2449_bfc6c6-8e> | </2449_63f87f-44> |
| 18 </2449_a12338-3c> | </2449_5c6aaa-f0> |
| 19 </2449_8bb562-23> | </2449_81837b-81> |
| 20 </2449_56928e-de> | </2449_f75630-5d> |
| 21 </2449_6ea7f6-8f> | </2449_5b4972-ff> |
| 22 </2449_571037-32> | </2449_3c4a1f-33> |
| 23 </2449_055c63-d8> | </2449_dc4876-f9> |
| 24 </2449_549438-dd> | </2449_445694-23> |
| 25 </2449_768251-34> | </2449_2b06fc-12> |
| 26 </2449_24d225-68> | </2449_1be554-64> |
Pictos Overview
Keep the loop compact and decisive. Walk forward guarding, bait a swing, and perfect parry. Immediately cash the counter to tag the combo finisher, then choose your conversion: takedown if the bar is full, or heavy ender into Clear Out if multiple targets are close. When you sense the tide turning, hit Barbaric Shout first; the shield and stagger convert panic moments into winning positions, and the window it creates makes Clear Out non-negotiable for the next two beats. If the mob is small or you’re tunneling a high-health threat, swap Clear Out for Flurry of Blows and ride the lifesteal to stay planted while the bleeds tick. Always re-cast Arcane Veil before committing to long strings or boss windows; it’s cheap insurance that also keeps your timing greedy without punishment.
Two anchors keep the build honest. First, never swing blindly into red telegraphs—step, parry, and cash the finisher instead. Second, don’t chase whiffs with stamina-draining heavies; reset with a quick step, re-guard, and bait again. The build’s damage comes from advantage, not spam. When it hums, fights read the same: shout to seize tempo, parry to mint a finisher, bleed the pack, and decide which target gets the takedown. That’s the Crimson Warlord—measured, brutal, and always in control.
How to Play
| Vitality </2449_c6fc30-a6> | Might </2449_545797-74> | Luck </2449_a98352-dc> | Defense </2449_1c6f7d-7a> | Agility </2449_4a4636-f6> |
| 3 </2449_5356fb-67> | 0 </2449_78b214-ce> | 0 </2449_e3a7df-45> | 3 </2449_24cfbc-15> | 1 </2449_44884a-2f> |
By Act 3, Berserker Verso is fully online. The playstyle doesn’t change much — the difference is that his numbers become monstrous. The skill set shifts slightly: Leadership replaces Blitz in the flex slot, giving you the ability to feed AP to allies when needed. It adds a splash of team support to a build that otherwise lives for selfish damage.
The main loop stays the same. Use Overload or Defiant Strike to cut down your HP and push your rank. From there, Berserk Slash is your bread-and-butter nuke, while Phantom Stars becomes your best tool for AoE and break-heavy fights. Defiant Strike stays relevant because marks never go out of style, and with Double Mark and Stay Marked pictos, you’ll be feeding your team bonus damage constantly.
With Painted Power added to the Picto loadout, Berserker Verso’s ceiling skyrockets. Combine that with his natural perfection scaling, and you’ve got one of the highest-damage carries in the game. He isn’t just a solo monster either. He slots seamlessly into mark-based comps, where allies like Monoko or Lun can capitalize on the marks he spreads. This is a build for players who enjoy pushing everything to the edge. You’ll constantly live at one HP, you’ll need to dodge and parry clutch hits, but the reward is insane damage, great flexibility, and the satisfaction of watching Berserk Slash delete bosses outright. For anyone who wants Expedition 33 to feel like a high-speed brawl where survival is never guaranteed, Berserker Verso is the way to go.
Build Snapshot
Related Builds

Support the Website
Thank you for choosing RPGael!
RPGael is kept ad-free so you can enjoy builds without distractions. If you’d like to support the site, you can donate through Ko-fi or check out the RedGael YouTube channel. Every bit of support helps keeps new content coming!


