
Bullet Dancer
Overview
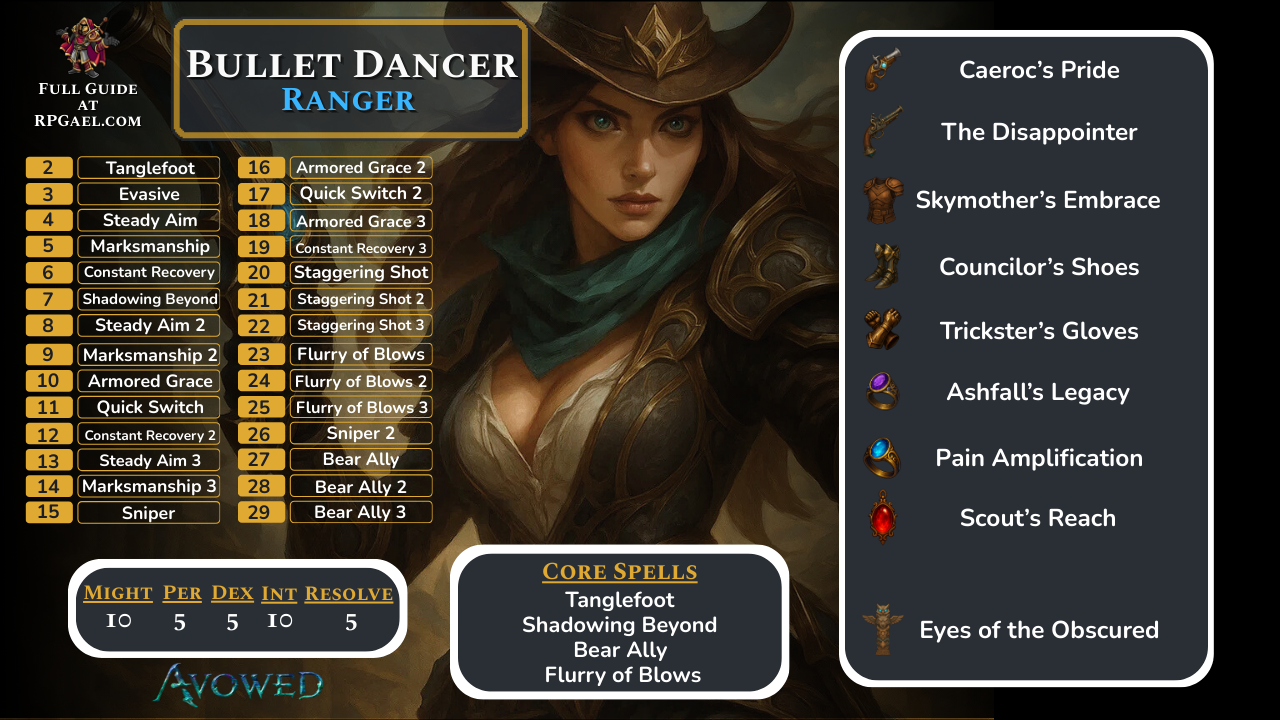
If you want to glide through fights like a gunslinging specter—appearing, deleting a target, and vanishing before the dust lands—the Bullet Dancer is your build. It’s a precision-first, speed-obsessed ranged package that chains slowed-time power shots, instant weapon swaps, and ruthless target selection to end encounters before they begin. The kit leans on Shadowing Beyond to reset or assassinate, Steady Aim to turn every pull of the trigger into a head-popping moment, and Quick Switch to dodge reload downtime by cycling between dual pistols and a devastating arquebus. With Tanglefoot to pin pursuers and a Bear Ally to soak aggro, you control the pace from the first muzzle flash to the last.
Act 1
|
Might |
Constitution |
Dexterity |
Perception |
Intelligence |
Resolve |
|
3 |
0 |
0 |
3 |
1 |
3 |
At character creation, push Perception first for crit chance and headshot reliability, then Might for raw shot damage; Resolve comes next so you can keep dodging, repositioning, and powering shots without running dry. Dexterity is optional here—this build doesn’t win by spraying faster; it wins by landing perfect, slowed-time power shots and abusing reload skipping via Quick Switch. Your opening loop is simple and brutally effective: open from stealth with the arquebus for a huge alpha strike, then swap to your pistols, fire deliberate power shots, and kite behind cover. As soon as you unlock Tanglefoot, you get breathing room against melee: drop it in their path, step laterally to a clean angle, and line up heads. Shadowing Beyond is your “nope” button—heal, revive, or hard-reset position safely, then re-enter with advantage. Once Steady Aim is online, you’ll effectively play in slow motion whenever you commit to a shot; combine that with Staggering Shot and even beefy brutes tip into stun after a couple of powered hits. Quick Switch ties it together: empty two power shots from each pistol, swap to the arquebus for a pair of thundering blasts, then swap back as your pistols finish reloading offscreen. Summon Bear Ally early in the fight so it taunts and body-blocks while you surgically remove ranged threats.
Early Levels
|
Level |
Spell/Passive |
|---|---|
|
2 |
Tanglefoot |
|
3 |
Evasive |
|
4 |
Steady Aim |
|
5 |
Marksmanship |
|
6 |
Constant Recovery |
|
7 |
Shadowing Beyond |
|
8 |
Steady Aim II |
|
9 |
Marksmanship II |
|
10 |
Armored Grace |
|
11 |
Quick Switch |
|
12 |
Constant Recovery II |
|
13 |
Steady Aim III |
|
14 |
Marksmanship III |
|
15 |
Sniper |
Act 1 Equipment
|
Item |
Details |
|---|---|
|
Primary Weapon  Caeroc’s Pride |
Provides +15% bonus damage and additional status effects |
|
Primary Weapon 2  The Disappointer |
Additional fire damage and mana resource |
|
Offhand Weapon  One Last Trick |
Provides +30% damage from having all blast abilities and refunds 25% of mana cost on impact |
|
Armor  Vailian Breastplate |
The best armor piece in The Veilguard, provides longer advantage duration, +10% damage for EVERY advantage (you will typically always have 3+), makes the advantages more effective and most importantly heals you for +5% when gaining an advantage which will offset the self damage of Maw of the Black City |
|
Boots  Any |
Makes your abilities a guaranteed critical hit at the cost of our health, this issue is completely negated by Garb of Kinship & Twin Buckle Binding |
|
Gloves  Gloves of the Strangler |
Extra Fire Damage |
|
Ring 1  Ring of Pain Amplification |
Significant boosts to our blast ability damage and returns our mana when critical hitting with blast abilities, working in perfect combination with Maw of the Black City |
|
Ring 2  Any |
Extra healing and ability damage |
|
Amulet  Enchanted Suolenet |
|
|
Totem  The Schemer’s Offering |
Final Build
|
Might |
Constitution |
Dexterity |
Perception |
Intelligence |
Resolve |
|
10 |
0 |
5 |
5 |
10 |
5 |
The fight plan never wastes a second. Open with stealth into a point-blank arquebus headshot, immediately step to cover, and trigger Steady Aim for your next shot window. Summon Bear Ally so melee turns its back to you; if they don’t, throw Tanglefoot across their line to you so their advance becomes a shooting gallery. Fire two deliberate power shots from pistol one, two from pistol two, Quick Switch to the arquebus and deliver another pair; by the time the barrel smoke clears, your pistols are reloaded and ready to repeat. Any elite that survives those six shots is either already stunned from Staggering Shot or one bullet away—finish the chain and move on. If a Priest or Summoner appears, pop Shadowing Beyond, walk past the scrum, and materialize behind them with Steady Aim primed; one powered pistol crit usually deletes them, and if not, the follow-up arquebus blast absolutely will.
Positioning is everything. Always shoot from an angle that forces enemies to pivot; while they rotate, you’re lining up another head. Treat Steady Aim like a metronome—commit only when you have a safe lane, then squeeze for guaranteed crits. Don’t reload manually unless you must; the entire rhythm is built around Quick Switch cycling to avoid downtime. Use Shadowing Beyond proactively, not just as a panic button: re-stealth to refresh the “alpha strike,” to revive safely, or to convert a messy brawl into two clean pickoffs. Against bosses, keep Bear Ally peeling and layer Staggering Shot—sustained powered hits will push them into repeated stuns, letting you maintain tempo without ever conceding space.
Final Levels
|
Level |
Spell/Passive |
|---|---|
|
16 |
Armored Grace II |
|
17 |
Quick Switch II |
|
18 |
Armored Grace III |
|
19 |
Constant Recovery III |
|
20 |
Staggering Shot |
|
21 |
Staggering Shot II |
|
22 |
Staggering Shot III |
|
23 |
Flurry of Blows |
|
24 |
Flurry of Blows II |
|
25 |
Flurry of Blows III |
|
26 |
Sniper II |
|
27 |
Bear Ally |
|
28 |
Bear Ally II |
|
29 |
Bear Ally III |
Final Equipment Overview
This build spikes absurdly early because you can secure two premier pistols fast. Start with The Disappointer and immediately enchant it from its miserable baseline to a proper damage bonus; once fixed, it’s a clean +% attack damage sidearm that feeds the build’s one-shot plan. Pair it with Kox’s Pride as soon as possible: the bonus shock damage is perfect on crit chains, and its upgrade that procs Crackling Bolt on kill is hilariously efficient at erasing clustered trash the moment your first victim drops. Much later, Fair Favor (Fair Play) becomes a luxury swap, returning health and a huge chunk of stamina on kill—ideal for marathon fights or risky solo picks—but the early duo already carries Path of the Damned. Your backbar should be the Heavenstrike arquebus: its bonus frost damage and, more importantly, high frost accumulation on power attacks punish anything that lives long enough to matter. Because you only take power shots, Heavenstrike’s secondary effect triggers constantly, layering control as you cycle.
Armor is Wavebinder Robes—light, fast, and purpose-built, granting a hefty critical chance bonus specifically for pistols and arquebus. The stamina/Essence headroom from light armor keeps your cadence smooth when you’re chaining Steady Aim and Quick Switch. For hands, Trickster’s Gloves are best-in-slot: a modest crit chance bump paired with a massive crit damage boost that multiplies every precise hit. Boots are flexible; Counselor’s Shoes offer a practical mix of a little Essence, longer dodges, and Dexterity to make mid-fight swapping and angle changes snappier. Anchor your accessories around crit and shot damage: Ashfall’s Legacy is mandatory with its flat attack damage plus big pistol/arquebus crit damage, and Ring of Pain Amplification stacks on more crit multiplier. For the trinket, Scout’s Reach adds raw Perception to push your crit floor higher—simple and perfect.
Round the kit with the Eyes of the Obscured totem. Its Fickle Winds passive splashes heavy random accumulation on each crit; because you crit constantly, every target accrues frost, bleed, fire—something—until it topples. The totem’s secondary perks (extra crit, defensive padding after Clear Out–style spikes, “second wind” via Shadowing Beyond synergy, and heal-on-kill lines) quietly solve the build’s only real problems: longevity when a fight drags and safety during aggressive repositioning. With this loadout, the Bullet Dancer becomes a closed loop: you open with an execution, the gear refuels your tempo, the totem accelerates kills the longer a target survives, and Quick Switch ensures you never, ever stand still to reload.
|
Item |
Details |
|---|---|
|
Primary Weapon Caeroc’s Pride |
Provides +15% bonus damage and additional status effects |
|
Primary Weapon 2 The Disappointer |
Additional fire damage and mana resource |
|
Offhand Weapon Heavenstrike |
Provides +30% damage from having all blast abilities and refunds 25% of mana cost on impact |
|
Armor  Skymother’s Embrace |
The best armor piece in The Veilguard, provides longer advantage duration, +10% damage for EVERY advantage (you will typically always have 3+), makes the advantages more effective and most importantly heals you for +5% when gaining an advantage which will offset the self damage of Maw of the Black City |
|
Boots  Councilor’s Shoes |
Makes your abilities a guaranteed critical hit at the cost of our health, this issue is completely negated by Garb of Kinship & Twin Buckle Binding |
|
Gloves Trickster’s Gloves |
Extra Fire Damage |
|
Ring 1 Ashfall’s Legacy |
Significant boosts to our blast ability damage and returns our mana when critical hitting with blast abilities, working in perfect combination with Maw of the Black City |
|
Ring 2 Ring of Pain Amplification |
Extra healing and ability damage |
|
Amulet Scout’s Reach |
|
|
Totem Eyes of the Obscured |
Build Snapshot
Related Builds
Support the Website
Thank you for choosing RPGael!
RPGael is kept ad-free so you can enjoy builds without distractions. If you’d like to support the site, you can donate through Ko-fi or check out the RedGael YouTube channel. Every bit of support helps keeps new content coming!

