
Cultist Monoco
Overview
Learn how to use the most versatile character in Expedition 33 with the Cultist Monoco Build. Our guide on Monoco will show you the best recommendations for weapons, luminas, skills and combos. We hope you enjoy this build on your journey to defeat the Paintress. Cultist Monoco is not going to jump off the damage charts or be the best pure support but it’s versatility is unmatched, he can pivot between being the main damage dealer, the support your team needs or even tank a few hits, making him the perfect glue to any team composition. This build leans into all three of these aspects so that he can be the ultimate jack-of-all-trades.
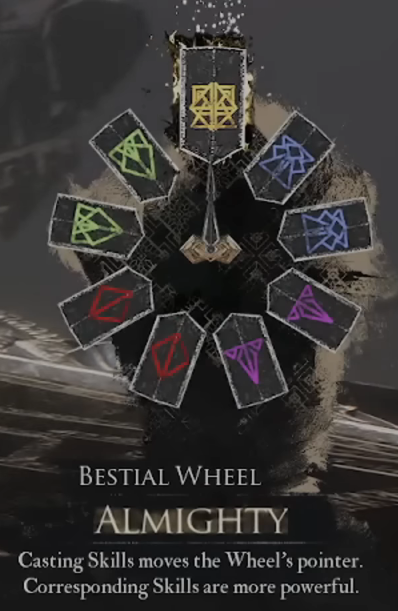
Mask Wheel
Monoco has five masks – Agile, Caster, Heavy, Balanced, and Almighty. Each ability is tied to one of these masks and becomes stronger when used while wearing the matching one. Every ability also spins the mask wheel by a set number of slots. Your primary goal is to land on the Almighty mask as often as possible. Almighty boosts all of Monoco’s abilities and synergizes with several of his best weapons. The core idea is to run a mix of powerful skills with different mask types and spin values so you can rotate into Almighty consistently.
Act 1 & 2
Monoco really finds his stride in Act 2. He’ll be outpaced in raw damage by late game and can fall behind Sciel or even Verso as a pure support, but he still brings plenty of value. You won’t regret keeping him in your party.
- Cultist Blood will cut Monoco’s HP, which when paired with the right luminas actually grants shields, boosts damage and crit chance while low. It also deals phenomenal AoE damage capable of wiping out the battlefield.
- Cultist Slashes scales harder the lower your HP is, pairing perfectly with Cultist Blood and its lumina package. Reliable, low cost, strong single target damage.
- Cruler Barrier allows Monoco to pivot into support at a moments notice, shields are king in this game; raw Defense rarely saves you. Cruler Barrier provides on-demand shielding and, on Heavy or Almighty, generates APas well. It belongs in every Monoco build.
- Benisseur Mortar is good damage on Caster mask, but more importantly, when used on a marked enemy it jumps you straight to Almighty mask. It’s a key rotation button, especially with teammates who apply marks or with free-aim pictos that let Monoco mark them himself.
- Moissonneuse Vendage has solid single target damage but shines as a cheap, consistent break tool. Monoco is excellent at breaking quickly; this keeps that identity intact through mid-game and beyond.
- Clair Enfeeble has respectable AoE and applies Powerless, Powerless is still effective in Act 2 before enemy damage numbers begin to get too high, this offers some additional utility to help your team survive.
Monoco starts each battle at a random spot on the mask wheel, so a fixed rotation doesn’t make sense. The build is intentionally as flexible as can be to provide you with multiple options of AoE, single-target, shields, and break tools so that your rotation changes based on the fight and what mask Monoco starts on. The general rule is to open with Cultist Blood whenever possible. It turns on your lumina package of shield, damage, crit, power, and rush. From there, either use a skill that matches your current mask or rotates into Almighty for the next turn, ideally both. This is why you run different spin values across skills, so you can hit Almighty reliably without bricking your turn.
Leveling
|
Level |
Spell/Passive |
|
1 |
Cultist Blood |
|
2 |
Cultist Slashes |
|
3 |
Cruler Barrier |
|
4 |
Benisseur Mortar |
|
5 |
Moissonneuse Vendage |
|
6 |
Clair Enfeeble |
Attributes
Monoco’s attributes will be Agility as the first priority for speed and weapon scaling. Defense as the second, to match main-weapon scaling and add a bit of critical chance and lastly Might for a large base damage boost.
Act 1 & 2 Luminas
|
Lumina |
Location |
|---|---|
|
At Death’s Door |
Defeat Lampmaster |
|
Augmented Aim |
Flying Waters – Ontop of Anchor |
|
Augmented First Strike |
Esquie’s Nest – Defeat Francois |
|
Breaker |
Ancient Sanctuary – Ultimate Sakipatate |
|
Breaking Burn |
The Continent – Southwest of Old Lumiere |
|
Burning Shots |
Monoco’s Station – Grandis Merchant |
|
Critical Break |
The Continent – Paint Spike West of Isles of Eyes |
|
Critical Burn |
Spring Meadows – Small Cave |
|
Critical Moment |
Gestral Village – Purchased from Jujubree |
|
Dead Energy |
Spring Meadows – Through a Cave |
|
Dodger |
Spring Meadows – Defeat Portier |
|
Energising Break |
Flying Waters – Past the Chromatic Troubadour |
|
Energising Start |
The Continent – Beach North of Gestral Village |
|
First Strike |
Stone Wave Cliffs – Near Paintress Shrine Flag |
|
Glass Canon |
Visages – Sad Path |
|
Greater Powerful |
Sirene – Purchase from Klaudiso |
|
Immaculate |
Visages – Boss |
|
In Media Res |
Dark Shores |
|
Inverted Affinity |
Forgotten Battlefield – Trader Kasumi |
|
Longer Powerful |
Old Lumiere – Merchant Mandelgo |
|
Marking Shots |
Flying Waters – Head Left at Fork |
|
Rewarding Mark |
Flying Waters – After Coral Cave Flag |
|
Solidifying |
Crushing Cavern – Giant Sapling |
|
SOS Power |
Stone Wave Cliffs – Ledge by Water |
|
SOS Rush |
Fallen Leaves – Wooden Barrels |
|
Stay Marked |
The Monolith – Past Tainted Waters Flag |
Weapons
|
Item |
Location |
|---|---|
|
Weapon 1  Ballaro |
Defeat Golgra with Monoco |
|
Weapon 2 Joyaro |
Lampmaster Boss in Flying Manor |
Weapons Overview
The early weapon I like the most for Monoco is the Ballaro. It has solid AP generation early and smoother mask flow; it allows him to act as a solid support character while in act 2 for stronger characters like Lune or Verso while still remaining a threat.
Joyaro is by far and without a doubt Monoco’s best weapon on nearly every build. It starts you in Almighty every fight, grants turn-based damage bonuses when you avoid getting hit (great with shield stacking), and its final upgrade boosts break output. It’s the perfect fit for any Monoco build.
Act 3 Luminas
Pictos Overview
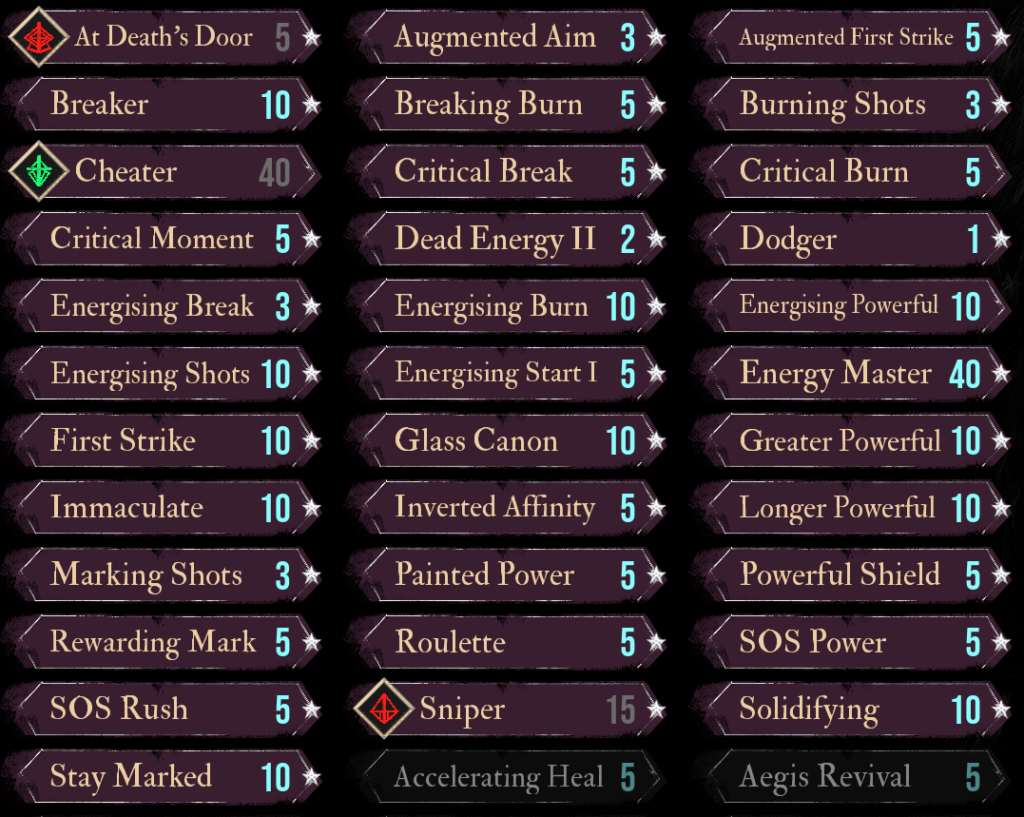
For Pictos use Cheater, At Death’s Door and Sniper. These will give you full critical chance and save you a bunch on Lumina cost.
How to Play
Once Act 3 begins, drop Clair Enfeeble and pick up Duallist Storm – Monoco’s strongest ability. You’ll unlock it very late by defeating one of two Duallists in the game but it’s well worth the effort. Duallist Storm has massive damage and is your new premier break tool. It’s expensive and best on Almighty, but the payoff is huge.
Benisseur Mortar remains your shuttle to Almighty: break with Duallist Storm, spin to Caster, mark, Mortar, and snap back to Almighty. Cultist Blood still remains an excellent AoE option and procs your low-HP lumina package. Cultist Slashes – Your cheap ST option stays relevant. Moissonneuse Vendage keeps its job as the budget breaker. Cruler Barrier will continue to anchor your shielding. Lastly do not ignore free aim attacks, they’re great for applying marks, burning targets, and with your AP flow they are basically free. I do also want to mention Monoco’s gradient attacks as they are some of my personal favorites. Level 1 is extremely strong; if a target is stunned, this deletes it. Level 2 grants Emergency shields on demand and Level 3 is a full stun on a boss regardless of current break which gives him phenomenal control.
Monoco pairs beautifully with Verso, his best friend, Verso’s frequent stuns and End Bringer ability will clean up anything Monoco breaks or softens. Lune is another standout partner, especially if she’s running break-centric tools like Terraquake. In general, Monoco thrives with break-heavy teammates: he supports them, sets them up, and still contributes his own damage.
Check the links below to browse more of the Best Builds for Clair Obscur: Expedition 33!
Related Builds

Support the Website
Thank you for choosing RPGael!
RPGael is kept ad-free so you can enjoy builds without distractions. If you’d like to support the site, you can donate through Ko-fi or check out the RedGael YouTube channel. Every bit of support helps keeps new content coming!

