
Phoenix Maelle
Overview
(Work in Progress)
Stances
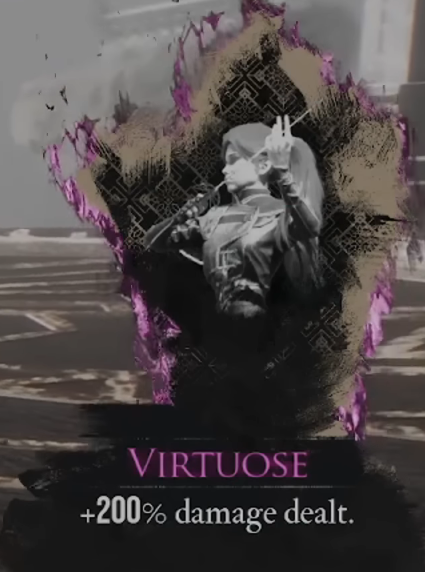
Maelle’s stance mechanic is one of the simplest in the game; she just has three modes: Offensive, Defensive, and Virtuose. Offensive stance Increases her damage but also the damage she takes. Defensive stance boosts her tankiness and AP generation. Lastly, the Virtuose stance which gives her a massive damage boost with zero downside. Every skill ties into a stance, applying effects and shifting Maelle between them. The catch is that Virtuose is harder to enter… normally. That’s where the Medalum weapon breaks the game design. Once you have it, you can stay in Virtuose permanently. The game intends for Maelle to alternate between stances each turn for balance, but Virtuose damage scaling is so absurd that there’s never a reason to make a build around any other stance.
Act 1 & 2
(Work in Progress)
Leveling
|
Level |
Spell/Passive |
|
1 |
Swift Stride |
|
2 |
Guard Up |
|
3 |
Fleuret Fury |
|
4 |
Breaking Rules |
|
5 |
Fencers Flurry |
|
6 |
Sword Ballet |
|
7 |
Egide |
|
8 |
Momentum Strike |
|
9 |
Payback |
|
10 |
Last Chance |
|
11 |
Gustaves Homage |
Attributes
(Work in Progress)
Act 1 & 2 Luminas
|
Lumina |
Location |
|---|---|
|
At Death’s Door |
Defeat Lampmaster |
|
Augmented Aim |
Flying Waters – Ontop of Anchor |
|
Confident Fighter |
Visages – Joy Path |
|
Dead Energy II |
Spring Meadows – Through a cave |
|
Dodger |
Spring Meadows – Defeat Portier |
|
Energising Start I |
The Continent – Beach North of Gestral Village |
|
Energising Start II |
Ancient Sanctuary |
|
Energising Turn |
Defeat Sirene |
|
First Strike |
Stone Wave Cliffs – Near Paintress Shrine Flag |
|
Glass Cannon |
Visages – Sadness Path |
|
Greater Defenceless |
The Monolith – Purchased from Melosh |
|
Immaculate |
Visages – Boss |
|
In Media Res |
Dark Shores – Sneak Past Mobs |
|
Inverted Affinity |
Forgotten Battlefield – Trader Kasumi |
|
Marking Shots |
Flying Waters – Head Left at the fork |
|
Rewarding Mark |
Flying Waters – After Coral Cave Flag |
|
SOS Power |
Stone Wave Cliffs – Ledge by the Water |
|
SOS Rush |
Fallen Leaves – Wooden Barrels |
|
Solidifying |
Crushing Cavern – Giant Sapling |
|
Teamwork |
Yellow Harvest – Merchant Pinabby |
Weapons
|
Item |
Location |
|---|---|
|
Weapon 1  Clierum |
Visages – Seething Bouchelier |
Weapons Overview
(Work in Progress)
Act 3 Luminas
|
Lumina |
Location |
|---|---|
|
Cheater |
The Continent – Defeat Sprong |
|
Full Strength |
Lumiere – Purchased from Cribappa |
|
Painted Power |
End of Act 2 |
|
Powerful Shield |
Endless Night Sanctuary – Merchant Anthonypo |
|
Roulette |
Flying Manor – Petank |
|
Shortcut |
Lumiere – Defeat the Aberration |
|
Energizing Shots |
Flying Manor – Goblus Arena |
Pictos Overview
For Pictos use At Death’s Door, Greater Defenceless and Shortcut. These will give you full critical chance and save you a bunch on Lumina cost.
How to Play
(Work in Progress)
Check the links below to browse more of the Best Builds for Clair Obscur: Expedition 33!
Related Builds
Support the Website
Thank you for choosing RPGael!
RPGael is kept ad-free so you can enjoy builds without distractions. If you’d like to support the site, you can donate through Ko-fi or check out the RedGael YouTube channel. Every bit of support helps keeps new content coming!

