

The Knife Juggler
Overview
The Crimson Warlord turns you into a blood-soaked juggernaut that locks enemies in stun and bleed while you stand your ground and punish every swing. The core loop is simple and ruthless: stack Constitution to stay upright, add Might so every hit chunks, keep enough Resolve to parry on demand, then rotate a short set of tools that feed each other—Barbaric Shout to break momentum and shield up, Clear Out to rip space and pile on stun/bleed across a pack (or Flurry of Blows for single-target drain), and Arcane Veil as a near-free layer of damage reduction. Parry windows are your accelerator: a perfect parry into a counter counts as the combo finisher, amplifying stun and bleed and setting up takedowns. Played cleanly, this is a high-skill, high-reward brawler that controls the pace of every fight and snowballs safety from offense.

Early Game & Character Creation
| Body </2393_a47413-ac> | Reflexes </2393_0ac624-62> | Tech </2393_a2a944-77> | Intelligence </2393_1e443e-01> | Cool </2393_4cbc5f-27> |
| 3 </2393_af5d64-0f> | 0 </2393_534827-0b> | 0 </2393_8cd1de-0b> | 3 </2393_482f18-55> | 1 </2393_c0d719-7c> |
Open with a three-hit chain mindset and build habits around timing. Use light–light–heavy strings to keep animation speed high, then cancel into a parry if anything telegraphs. Barbaric Shout is your first pivot—hit it as pressure builds, because the stagger buys room, the shield lets you stay in, and the window it creates makes landing your heavy ender trivial. When a mob starts to surround you, Clear Out resets the scrum: three wide sweeps that shove bodies away, rack up stun damage, and spread bleed across the pack. If you prefer boss tunneling, Flurry of Blows trades that board clear for lifesteal and brutal single-target tempo; it also pairs perfectly with the shout because the opening stagger lets every flurry connect.
Keep Arcane Veil up whenever you’re committing—it’s cheap, it smooths chip damage, and it buys the half-second you need to slip a parry. Don’t stress misses; this setup is forgiving. The stat spread does the safety work while you focus on rhythm: draw swings, perfect parry, cash out the counter for the combo finisher’s extra stun and bleed, then convert to a takedown or a final heavy. On elites and beasts, the Shout → Clear Out sequence nearly fills the stun bar by itself; finish with a charged strike to floor them and loop.
Early Levels
| Level </2393_18bf47-eb> | Spell/Passive </2393_3a4443-77> |
|---|---|
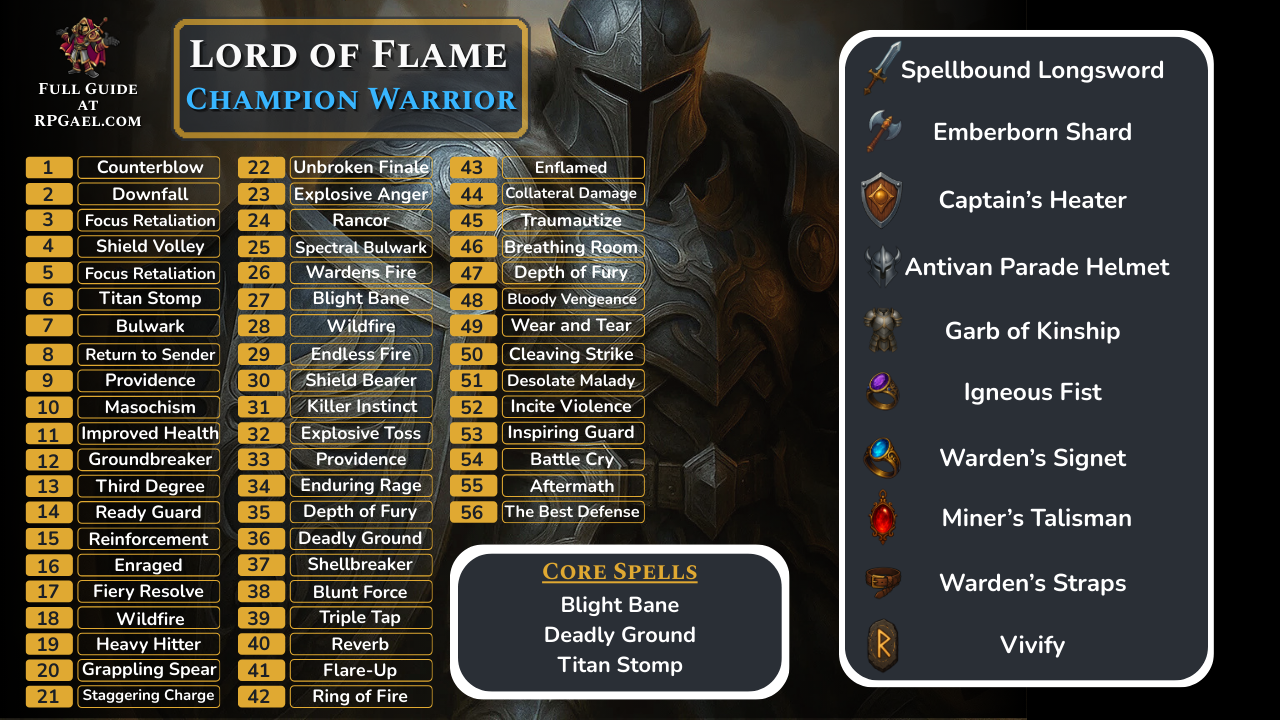
| 1 </2393_4add5c-3d> | Counterblow </2393_faa7d9-c1> |
| 2 </2393_c85bd8-1a> | Downfall </2393_cb6767-ef> |
| 3 </2393_560d45-37> | Focus Retaliation </2393_4266be-64> |
| 4 </2393_91a630-3d> | Shield Volley </2393_0025c5-75> |
| 5 </2393_6ca502-87> | Focus Retaliation </2393_82c77e-f1> |
| 6 </2393_90c08b-23> | Titan Stomp </2393_23695c-2c> |
| 7 </2393_492448-1f> | Bulwark </2393_739b6c-62> |
| 8 </2393_96f8c0-dc> | Return to Sender </2393_ebe623-a8> |
| 9 </2393_f5d7a6-07> | </2393_7a9e63-d6> |
| 10 </2393_e70f15-dd> | </2393_d5a97d-c6> |
| 11 </2393_1259b2-56> | </2393_48c6ab-b3> |
| 12 </2393_bef7b8-f1> | </2393_20d6fe-42> |
| 13 </2393_e5ac49-09> | </2393_8e296c-3a> |
| 14 </2393_054d16-73> | </2393_850c47-88> |
| 15 </2393_4bafe3-11> | </2393_ba2854-26> |
| 16 </2393_2b1577-64> | </2393_7d577a-9d> |
| 17 </2393_495999-2d> | </2393_0fb030-e1> |
| 18 </2393_ecf32a-1b> | </2393_2e270a-dd> |
| 19 </2393_2cfdf1-65> | </2393_52d617-cf> |
| 20 </2393_5cf842-16> | </2393_c5cda7-0f> |
| 21 </2393_e6132b-dc> | </2393_d46037-3e> |
| 22 </2393_1f5455-60> | </2393_d2bd59-ca> |
| 23 </2393_26555c-cd> | </2393_82a862-e0> |
| 24 </2393_d3fdfc-e6> | </2393_a5efd9-16> |
Weapons
| Item </2393_e4b99e-aa> | Details </2393_a6826b-13> |
|---|---|
| Weapon 1  Spellbound Longsword </2393_2ee53c-08> | Provides +15% bonus damage and additional status effects </2393_b062b2-ca> |
| Weapon 2  Emberborn Shard </2393_fdd564-86> | More then doubles your damage at the cost of additional mana </2393_bc9d53-a9> |
| Weapon 3 Captain’s Heater </2393_fa5ca7-f8> | Additional fire damage and mana resource </2393_e5d256-b3> |
| Weapon 4  Caraste’s Double Hat/Antivan Parade Helmet </2393_14e669-20> | Provides +30% damage from having all blast abilities and refunds 25% of mana cost on impact </2393_66380e-66> |
Weapons Overview
Keep the loop compact and decisive. Walk forward guarding, bait a swing, and perfect parry. Immediately cash the counter to tag the combo finisher, then choose your conversion: takedown if the bar is full, or heavy ender into Clear Out if multiple targets are close. When you sense the tide turning, hit Barbaric Shout first; the shield and stagger convert panic moments into winning positions, and the window it creates makes Clear Out non-negotiable for the next two beats. If the mob is small or you’re tunneling a high-health threat, swap Clear Out for Flurry of Blows and ride the lifesteal to stay planted while the bleeds tick. Always re-cast Arcane Veil before committing to long strings or boss windows; it’s cheap insurance that also keeps your timing greedy without punishment.
Two anchors keep the build honest. First, never swing blindly into red telegraphs—step, parry, and cash the finisher instead. Second, don’t chase whiffs with stamina-draining heavies; reset with a quick step, re-guard, and bait again. The build’s damage comes from advantage, not spam. When it hums, fights read the same: shout to seize tempo, parry to mint a finisher, bleed the pack, and decide which target gets the takedown. That’s the Crimson Warlord—measured, brutal, and always in control.
Cyberware
| Item </2393_021c3b-d7> | Details </2393_5a3d98-08> |
|---|---|
| Cortex Spellbound Longsword </2393_dec7cc-05> | Provides +15% bonus damage and additional status effects </2393_8ffd6a-fb> |
| Arms Emberborn Shard </2393_6a67e9-aa> | More then doubles your damage at the cost of additional mana </2393_dfc046-df> |
| Skeleton Captain’s Heater </2393_abbe08-dd> | Additional fire damage and mana resource </2393_520ddc-19> |
| Nervous Caraste’s Double Hat/Antivan Parade Helmet </2393_2ee3b5-03> | Provides +30% damage from having all blast abilities and refunds 25% of mana cost on impact </2393_0cf654-d9> |
| Integumentary  Garb of Kinship </2393_d3c718-c3> | The best armor piece in The Veilguard, provides longer advantage duration, +10% damage for EVERY advantage (you will typically always have 3+), makes the advantages more effective and most importantly heals you for +5% when gaining an advantage which will offset the self damage of Maw of the Black City </2393_942fd5-6f> |
| Operating System  Igneous Fist </2393_d74e42-93> | Makes your abilities a guaranteed critical hit at the cost of our health, this issue is completely negated by Garb of Kinship & Twin Buckle Binding </2393_43a0fb-81> |
| Face  Warden’s Signet </2393_5837d4-9b> | Extra Fire Damage </2393_42de90-2a> |
| Hands  Miner’s Talisman </2393_74376d-d0> | Significant boosts to our blast ability damage and returns our mana when critical hitting with blast abilities, working in perfect combination with Maw of the Black City </2393_2aa87a-c2> |
| Circulatory  Warden’s Straps </2393_9e7726-a1> | Extra healing and ability damage </2393_d3286b-66> |
| Legs  Warden’s Straps </2393_81424b-f5> | </2393_e81c1d-d3> |
Cyberware Overview
Keep the loop compact and decisive. Walk forward guarding, bait a swing, and perfect parry. Immediately cash the counter to tag the combo finisher, then choose your conversion: takedown if the bar is full, or heavy ender into Clear Out if multiple targets are close. When you sense the tide turning, hit Barbaric Shout first; the shield and stagger convert panic moments into winning positions, and the window it creates makes Clear Out non-negotiable for the next two beats. If the mob is small or you’re tunneling a high-health threat, swap Clear Out for Flurry of Blows and ride the lifesteal to stay planted while the bleeds tick. Always re-cast Arcane Veil before committing to long strings or boss windows; it’s cheap insurance that also keeps your timing greedy without punishment.
Two anchors keep the build honest. First, never swing blindly into red telegraphs—step, parry, and cash the finisher instead. Second, don’t chase whiffs with stamina-draining heavies; reset with a quick step, re-guard, and bait again. The build’s damage comes from advantage, not spam. When it hums, fights read the same: shout to seize tempo, parry to mint a finisher, bleed the pack, and decide which target gets the takedown. That’s the Crimson Warlord—measured, brutal, and always in control.
How to Play
| Body </2393_48ab66-b8> | Reflexes </2393_03aec6-13> | Tech </2393_d73826-6e> | Intelligence </2393_1f9c31-86> | Cool </2393_ffc4a6-30> |
| 3 </2393_d6a67f-7c> | 0 </2393_213115-ed> | 0 </2393_928823-0b> | 3 </2393_a647c6-75> | 1 </2393_564039-63> |
The Crimson Warlord turns you into a blood-soaked juggernaut that locks enemies in stun and bleed while you stand your ground and punish every swing. The core loop is simple and ruthless: stack Constitution to stay upright, add Might so every hit chunks, keep enough Resolve to parry on demand, then rotate a short set of tools that feed each other—Barbaric Shout to break momentum and shield up, Clear Out to rip space and pile on stun/bleed across a pack (or Flurry of Blows for single-target drain), and Arcane Veil as a near-free layer of damage reduction. Parry windows are your accelerator: a perfect parry into a counter counts as the combo finisher, amplifying stun and bleed and setting up takedowns. Played cleanly, this is a high-skill, high-reward brawler that controls the pace of every fight and snowballs safety from offense.
Final Levels
| Level </2393_d2a158-e3> | Spell/Passive </2393_dd8d28-8a> |
|---|---|
| 25 </2393_119f25-77> | Killer Instinct </2393_b15d47-26> |
| 26 </2393_818dba-69> | Explosive Toss </2393_d53241-e8> |
| 27 </2393_ccefda-82> | Providence </2393_e5fa4f-cf> |
| 28 </2393_a571d9-58> | Enduring Rage </2393_06fb19-3e> |
| 29 </2393_d368be-b5> | Depth of Fury </2393_5a6e1f-b2> |
| 30 </2393_afbe74-98> | Deadly Ground </2393_9f9820-66> |
| 31 </2393_633215-12> | Shellbreaker </2393_0482b6-85> |
| 32 </2393_0717f8-20> | Blunt Force </2393_b399e4-10> |
| 33 </2393_4d4d7f-a5> | Triple Tap </2393_d8d738-41> |
| 34 </2393_fb2e09-90> | Reverb </2393_516741-1c> |
| 35 </2393_979a68-aa> | Flare-Up </2393_7c5659-53> |
| 36 </2393_6e70c4-c9> | </2393_23447b-6d> |
| 37 </2393_a7fcc4-09> | </2393_7d683a-87> |
| 38 </2393_ef9a97-eb> | </2393_058ec0-61> |
| 39 </2393_63c793-05> | </2393_8dfd22-a3> |
| 40 </2393_b97cc0-0e> | </2393_6db6ba-4a> |
| 41 </2393_adf21d-dd> | </2393_803852-77> |
| 42 </2393_01058b-0a> | </2393_e77798-15> |
| 43 </2393_98abd2-98> | </2393_2395e6-e8> |
| 44 </2393_961e31-41> | </2393_44fc2d-8f> |
| 45 </2393_ed5254-6f> | </2393_eea5e6-1f> |
| 46 </2393_4338ca-22> | </2393_89a664-4b> |
| 47 </2393_1cb370-f2> | </2393_f9734c-60> |
| 48 </2393_a5614a-e5> | </2393_ec3194-ce> |
Build Snapshot
Related Builds

Support the Website
Thank you for choosing RPGael!
RPGael is kept ad-free so you can enjoy builds without distractions. If you’d like to support the site, you can donate through Ko-fi or check out the RedGael YouTube channel. Every bit of support helps keeps new content coming!


