
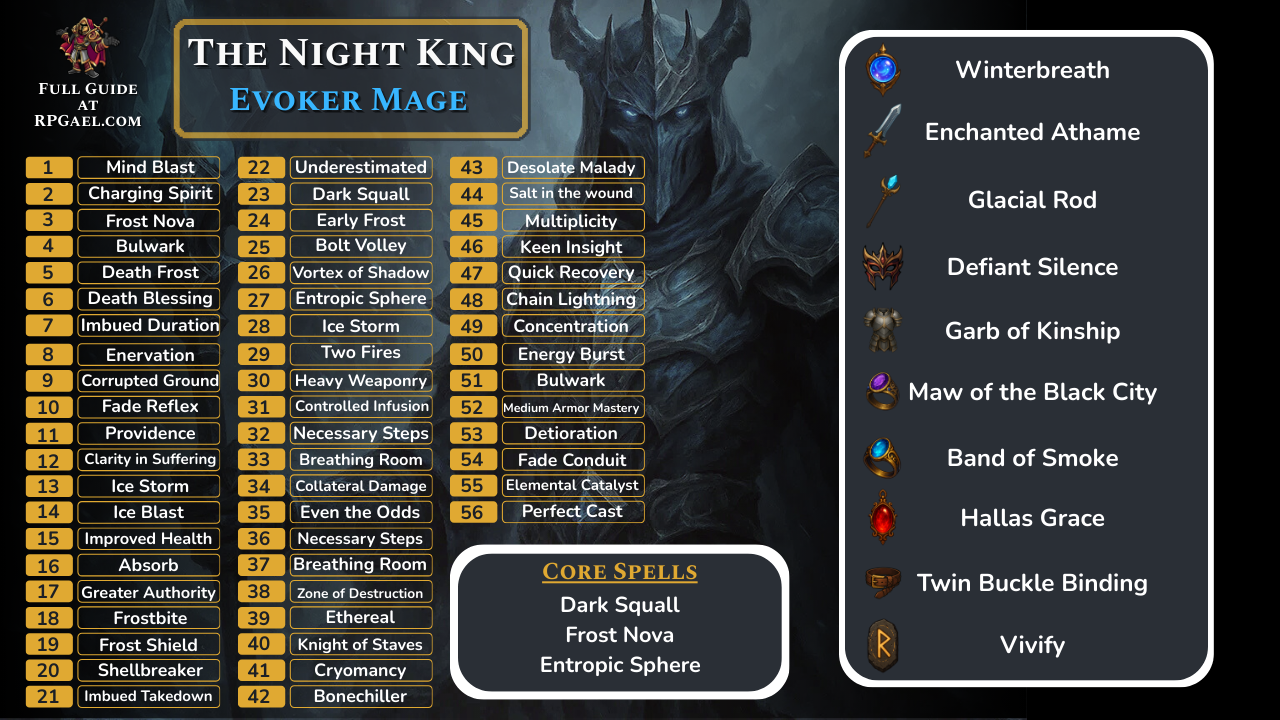
The Night King
Overview
The backbone of the build is the infamous Maw of the Black City + Garb of Kinship synergy, which completely negates Maw’s drawback while amplifying your damage and survivability to absurd levels. While that combo is broken on any mage, the Evoker is particularly suited to it because of how well its abilities scale with area and critical damage. Even bosses are trivialized once your sphere is rolling across the battlefield.

Early Game
Pick Shadow Dragons for smoother mana or Mourn Watch for affliction perks; faction is flavor, so don’t sweat it. The opening kit is tuned to keep you safe and casting: Frost Nova (your lifeline), Corrupted Ground (steady AoE that ticks while targets are rooted), Ice Blast (single-target punch). Grab Greater Authority early so Ice Blast swaps to a cooldown—now Nova, Ice Blast, and Ground form a rotation that doesn’t drain you. Bolt Volley is a simple staff DPS bump via extra projectile; learn to weave two or three light attacks, then finish chains cleanly while enemies are frozen in place or stuck inside your ground DoT. You’ll rely on the staff a lot before specialization, so always Nova first, place Ground where they’re clustered, then Ice Blast the priority target; keep firing between cooldowns to farm final-hit projectiles and free damage.
Early Levels
|
Level |
Spell/Passive |
|---|---|
|
1 |
Mind Blast |
|
2 |
Charging Spirit |
|
3 |
Frost Nova |
|
4 |
Bulwark |
|
5 |
Death Frost |
|
6 |
Death Blessing |
|
7 |
Imbued Duration |
|
8 |
Enervation |
|
9 |
Corrupted Ground |
|
10 |
Fade Reflex |
|
11 |
Providence |
|
12 |
Clarity in Suffering |
|
13 |
Ice Storm |
|
14 |
Ice Blast |
|
15 |
Improved Health |
|
16 |
Absorb |
|
17 |
Greater Authority |
|
18 |
Frostbite |
|
19 |
Frost Shield |
|
20 |
Shellbreaker |
|
21 |
Imbued Takedown |
|
22 |
Underestimated |
|
23 |
Dark Squall |
|
24 |
Early Frost |
|
25 |
Bolt Volley |
|
26 |
Vortex of Shadow |
|
27 |
Entropic Sphere |
|
28 |
Ice Storm |
|
29 |
Two Fires |
|
30 |
Heavy Weaponry |
Equipment
|
Item |
Details |
|---|---|
|
Primary Weapon Winterbreath |
Provides +15% bonus damage and additional status effects |
|
Secondary Weapon  Enchanted Athame |
More then doubles your damage at the cost of additional mana |
|
Staff  Veilseeker/Glacial Rod |
Additional fire damage and mana resource |
|
Helmet  Defiant Silence |
Provides +30% damage from having all blast abilities and refunds 25% of mana cost on impact |
|
Armor  Garb of Kinship |
The best armor piece in The Veilguard, provides longer advantage duration, +10% damage for EVERY advantage (you will typically always have 3+), makes the advantages more effective and most importantly heals you for +5% when gaining an advantage which will offset the self damage of Maw of the Black City |
|
Ring 1  Maw of the Black City |
Makes your abilities a guaranteed critical hit at the cost of our health, this issue is completely negated by Garb of Kinship & Twin Buckle Binding |
|
Ring 2  Band of Smoke |
Extra Fire Damage |
|
Amulet  Hallas Grace |
Significant boosts to our blast ability damage and returns our mana when critical hitting with blast abilities, working in perfect combination with Maw of the Black City |
|
Belt  Twin Buckle Binding |
Extra healing and ability damage |
|
Rune 1  Vivify |
Ability cooldowns are refreshed and the next ability is free |
|
Rune 2 Escalate |
Passive +10% Ability damage |
|
Rune 3 Glaciate |
Passive +10% Fire damage |
Equipment Overview
The Evoker’s kit is built around amplifying spell spam while leveraging cold damage. Defiant Silence is the natural helmet choice here for its heavy crit scaling, making every Entropic Sphere cast land like a bomb. Garb of Kinship pairs with Maw of the Black City once again, creating sustain from crits while multiplying damage output during advantages. The amulet slot favors Hallas Grace, reducing cooldowns on Frost Nova and Dark Squall so they’re always ready to pin down enemies for your giant storm to follow. For rings, Maw of the Black City unlocks constant crits, while Band of Smoke specifically pushes Ice Blast to the damage cap. Twin Buckle Binding remains the belt of choice, its healing and damage boost fitting seamlessly into the spam-heavy loop.
Weapons lean toward both flexibility and cold amplification. Winter Breath is the core choice, shredding chilled enemies while further reducing cold resistance, making Frost Nova and Entropic Sphere more devastating. Enchanted Athame slots in for a raw damage boost that this build can afford thanks to its cooldown-based rotation, while Glacial Rod allows for heavy attack synergy when you prefer a more aggressive frontline style. Swapping to Veil Seeker is a valid alternative if you’d rather lean on light attack barrages. No matter the staff, the weapon set ensures your cold-based nukes never run out of steam.
How to Play Late Game
The loop is straightforward. Frost Nova first to lock the field; Entropic Sphere through the largest lane so it clips frontliners and finishes in the backline; Dark Squall on stragglers or to peel charging elites; staff-weave to finish anything still standing. With Hallas Grace and Kinship advantages rolling, Nova and Squall are up constantly, so you’re repeatedly freezing the map. If mana falters or you mistime a cast, pop the Vivify Rune, drop another Sphere immediately, then re-establish Nova.
Positioning matters: aim Sphere so it travels through the pack rather than detonating early—walls or tight corners will pre-explode it and waste damage. On open maps, cast slightly off-center so it sweeps multiple lanes instead of tunneling one. For safer ranged maps or anti-necrotic matchups, swap to Veil Seeker and machine-gun light chains while the Sphere rolls.
The build shines because all pieces feed each other: Nova’s free freeze gives Sphere contact time, Sphere’s constant crits keep Kinship healing through Maws chip damage, Hallas Grace shaves cooldowns so the CC blanket never drops, and your staff pattern fills every gap with crit-amped projectiles. Nova → Sphere → Squall → staff chain, repeat—and you’ll watch Nightmare packs vanish under a blizzard that covers the whole screen.
Check the links below to browse more of the Best Builds for Dragon Age: The Veilguard!
Final Levels
|
Level |
Spell/Passive |
|---|---|
|
31 |
Controlled Infusion |
|
32 |
Necessary Steps |
|
33 |
Breathing Room |
|
34 |
Collateral Damage |
|
35 |
Even the Odds |
|
36 |
Necessary Steps |
|
37 |
Breathing Room |
|
38 |
Zone of Destruction |
|
39 |
Ethereal |
|
40 |
Knight of Staves |
|
41 |
Cryomancy |
|
42 |
Bonechiller |
|
43 |
Desolate Malady |
|
44 |
Salt in the wound |
|
45 |
Multiplicity |
|
46 |
Keen Insight |
|
47 |
Quick Recovery |
|
48 |
Chain Lightning |
|
49 |
Concentration |
|
50 |
Energy Burst |
|
51 |
Bulwark |
|
52 |
Medium Armor Mastery |
|
53 |
Detioration |
|
54 |
Fade Conduit |
|
55 |
Elemental Catalyst |
|
56 |
Perfect Cast |
|
57 |
Killer Instinct |
|
58 |
Catalyst |
|
59 |
Wrath |
|
60 |
Reclamation |
|
61 |
Enervation |
|
62 |
Tempest |
|
63 |
Onslaught |
|
64 |
Staff Mastery |
|
65 |
Quickened Strikes |
- Every ability node is an extra 15% passive damage so we want to grab as many abilities as possible even if we are not using them
Build Snapshot
Related Builds


Support the Website
Thank you for choosing RPGael!
RPGael is kept ad-free so you can enjoy builds without distractions. If you’d like to support the site, you can donate through Ko-fi or check out the RedGael YouTube channel. Every bit of support helps keeps new content coming!

