
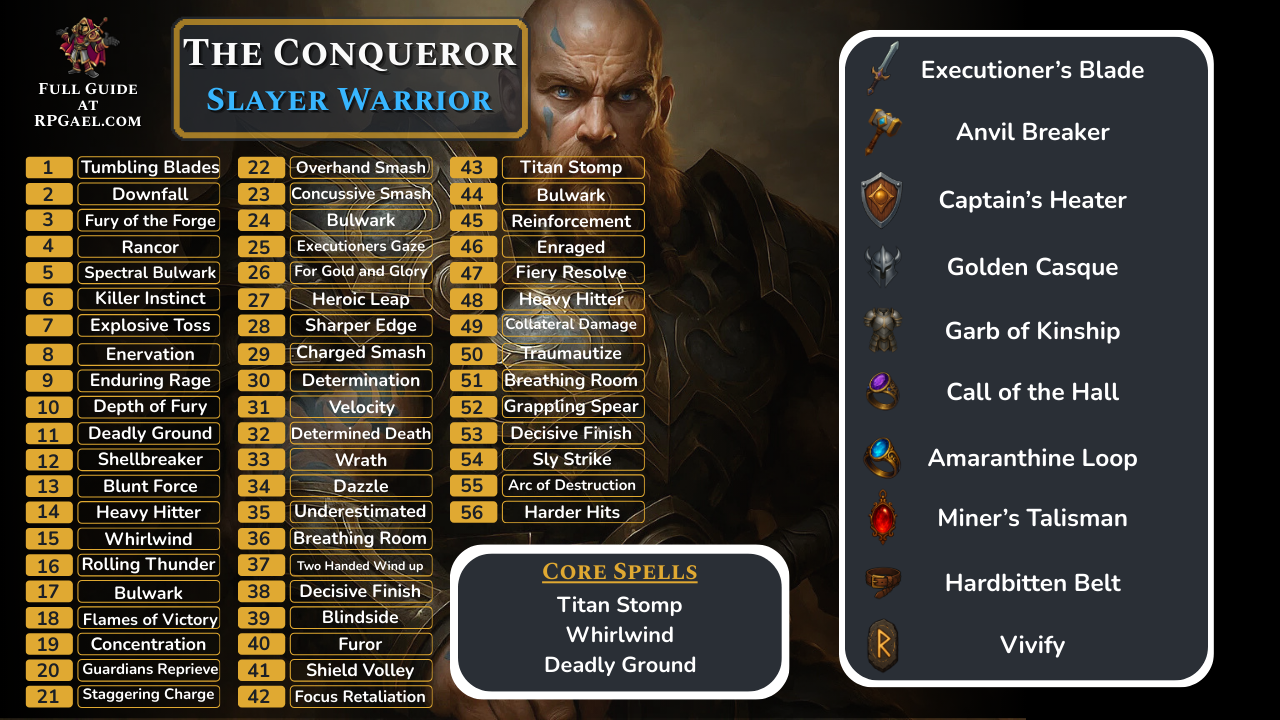
The Conqueror
Overview
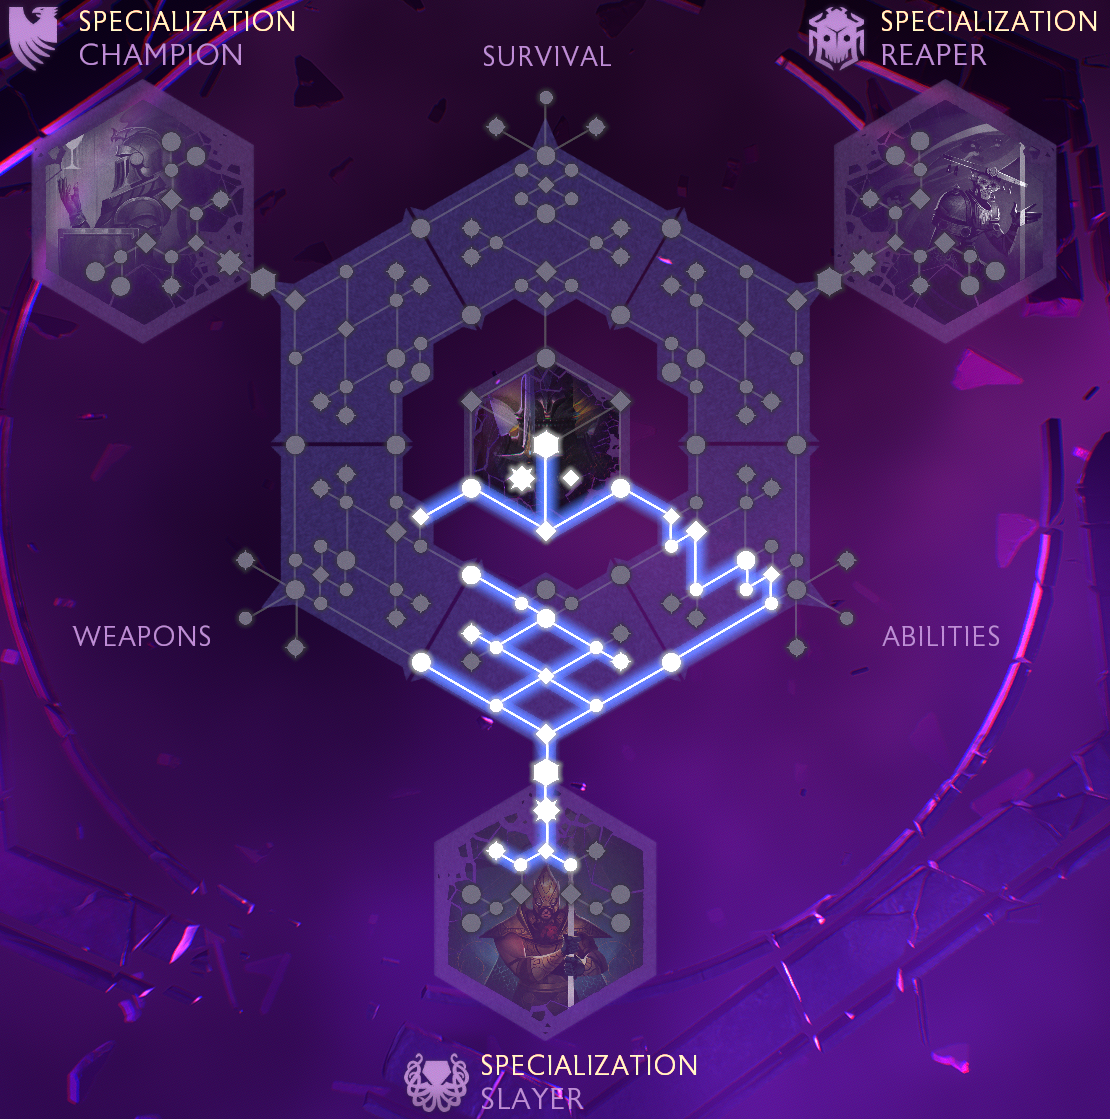
This build is all about control and raw power. If you want to keep enemies permanently staggered while crushing them with massive two-handed charged attacks, the Slayer specialization delivers one of the most oppressive playstyles in Dragon Age: The Veilguard. This is not a subtle build—every swing, stomp, and slam is meant to put enemies on the ground and punish them with devastating follow-ups. It feels like a constant loop of knockdowns and critical hits, with your foes barely able to stand before being dropped again.
What makes the Slayer so dangerous is how well its toolkit flows together. Titan Stomp and Deadly Duration keep entire groups of enemies locked down, while Whirlwind lets you sweep through clustered packs and finish with crushing damage. Combined with attack-string passives that speed up heavy swings, you’re able to chain stagger after stagger until nothing is left standing. On Nightmare difficulty, this level of crowd control trivializes some of the hardest encounters. It’s not elegant, but it’s brutally effective—and that’s exactly what the Slayer is designed to be.
Early Game
For faction choice, the Lords of Fortune provide the most direct boost to stagger damage, but as always, the story appeal of a faction may be more important long term. Early Warriors already dominate, though this build leans into two-handed play for flavor. Sword-and-shield is technically stronger for the first 20 levels, so if you want the absolute smoothest start, you could follow a Champion path early and respec once Slayer becomes available.
The three best starter abilities are Titan Stomp, Driving Kick, and Spectral Bulwark. Titan Stomp is the standout—it deals strong stagger damage in an AOE, applies Overwhelm, and has no rage cost, letting you save your resource for harder-hitting moves. Driving Kick is your first rage spender, cheap and spammable, and it doubles as one of the most satisfying ways to deal with tough enemies—booting them off ledges never gets old. Spectral Bulwark isn’t exciting, but because it doesn’t cost rage, it pairs well with Kick by letting you save resources.
Several passives make this phase stronger. Downfall guarantees critical hits on knocked-down enemies, which synergizes perfectly with your constant staggers. Blunt Force creates even more knockdowns when armor breaks, setting up those free crits. And Rolling Thunder—the most important early Slayer passive—shortens the time between your heavy swings, letting you chain stagger faster instead of being stuck in long, punishable animations. Together, these tools make the early game not only powerful, but extremely fun, with a rhythm of knockdowns and massive punishing blows.
Early Levels
|
Level |
Spell/Passive |
|---|---|
|
1 |
Tumbling Blades |
|
2 |
Downfall |
|
3 |
Fury of the Forge |
|
4 |
Rancor |
|
5 |
Spectral Bulwark |
|
6 |
Killer Instinct |
|
7 |
Explosive Toss |
|
8 |
Enervation |
|
9 |
Enduring Rage |
|
10 |
Depth of Fury |
|
11 |
Deadly Ground |
|
12 |
Shellbreaker |
|
13 |
Blunt Force |
|
14 |
Heavy Hitter |
|
15 |
Whirlwind |
|
16 |
Rolling Thunder |
|
17 |
Bulwark |
|
18 |
Flames of Victory |
|
19 |
Concentration |
|
20 |
Guardians Reprieve |
|
21 |
Staggering Charge |
|
22 |
Overhand Smash |
|
23 |
Concussive Smash |
|
24 |
Bulwark |
|
25 |
Executioners Gaze |
|
26 |
For Gold and Glory |
|
27 |
Heroic Leap |
|
28 |
Sharper Edge |
|
29 |
Charged Smash |
|
30 |
Determination |
Equipment
|
Item |
Details |
|---|---|
|
Primary Weapon  Executioner’s Blade |
Provides +15% bonus damage and additional status effects |
|
Secondary Weapon  Anvil Breaker |
More then doubles your damage at the cost of additional mana |
|
Shield  Captain’s Heater |
Additional fire damage and mana resource |
|
Helmet Golden Casque |
Provides +30% damage from having all blast abilities and refunds 25% of mana cost on impact |
|
Armor  Garb of Kinship |
The best armor piece in The Veilguard, provides longer advantage duration, +10% damage for EVERY advantage (you will typically always have 3+), makes the advantages more effective and most importantly heals you for +5% when gaining an advantage which will offset the self damage of Maw of the Black City |
|
Ring 1  Call of the Hall |
Makes your abilities a guaranteed critical hit at the cost of our health, this issue is completely negated by Garb of Kinship & Twin Buckle Binding |
|
Ring 2  Amaranthine Loop |
Extra Fire Damage |
|
Amulet  Miner’s Talisman |
Significant boosts to our blast ability damage and returns our mana when critical hitting with blast abilities, working in perfect combination with Maw of the Black City |
|
Belt  Hardbitten Belt |
Extra healing and ability damage |
|
Rune 1  Vivify |
Ability cooldowns are refreshed and the next ability is free |
|
Rune 2 Daze |
? |
|
Rune 3 Pierce |
Passive +10% Penetration damage |
Equipment Overview
The Slayer’s weapon loadout is built around enhancing stagger and charged attack damage. The Executioner Blade increases both, reinforcing the charged-heavy playstyle that defines this build. Captain’s Heater serves as your shield of choice—not because you’ll use it actively, but because its bonuses to weapon damage and stagger make it the most reliable option. The main weapon is the Anvilbreaker, which synergizes perfectly by increasing stagger output and extending stagger duration, giving you more time to capitalize with heavy follow-ups. Together, these weapons create a loop where enemies stay locked down longer and every swing hits harder.
For armor and accessories, the goal is to further enhance stagger output and fuel ability uptime. The Garb of Kinship remains best-in-slot, sustaining you through damage taken and amplifying advantages gained from your endless staggers. The chosen helmet provides additional stagger and takedown bonuses while drastically improving ultimate uptime, letting you dive into Golden Glory more often. The Hard-Bitten Belt extends stagger duration by 50% and increases takedown damage, making every knockdown even more punishing. For amulets, Miner’s Talisman synergizes with your AOE-heavy kit by granting rage and damage boosts every time your abilities hit multiple targets. Call of the Hall and Amaranthine Loop are excellent rings that both stack stagger and takedown damage while feeding into Garb of Kinship’s advantage loops. Finally, Vivify is the go-to rune for nearly every build, enabling ability resets and burst windows, while Daze adds more stagger potential and Pierce shores up penetration against armored foes. All of these pieces combine to keep enemies permanently locked in stagger loops while amplifying every punish that follows.
How to Play Late Game
Once the Slayer specialization unlocks, the kit comes together. Whirlwind replaces Driving Kick as your main rage spender, spinning for high stagger and finishing with a crushing final hit. Deadly Duration provides consistent AOE damage and keeps advantages flowing, while Titan Stomp remains a core ability for its range, crowd control, and synergy with passives. The ultimate, Golden Glory, is one of the most satisfying in the game—launching into the air and dive-bombing enemies for massive AOE damage that wipes groups in one strike. With proper gear, it’s available frequently and hits like a hammer from the heavens.
Passives like Arc of Destruction round out the build by letting you follow sprint attacks with devastating final swings. Combined with Rolling Thunder, these passives transform slow, cumbersome heavy attacks into a much faster and deadlier sequence. The general play pattern is simple but brutally effective: open fights with Titan Stomp to stagger groups, follow with Deadly Duration for extra pressure, then weave heavy attacks until enemies drop. When they’re down, capitalize with Downfall crits or takedowns for huge damage spikes. Whirlwind clears clustered enemies and feeds your stagger loop, and Golden Glory functions as both a panic button and a finisher for large encounters.
The Slayer doesn’t rely on delicate rotations or intricate setups. It’s a build about brute force—slam enemies until they fall, punish them on the ground, and repeat until the battlefield is cleared. By the time your gear is optimized, you’ll be staggering everything in sight and chaining takedowns nonstop. On Nightmare difficulty, that level of control makes the Slayer one of the most dominating Warrior builds in the entire game.
Final Levels
|
Level |
Spell/Passive |
|---|---|
|
31 |
Velocity |
|
32 |
Determined Death |
|
33 |
Wrath |
|
34 |
Dazzle |
|
35 |
Underestimated |
|
36 |
Breathing Room |
|
37 |
Two Handed Wind Up |
|
38 |
Decisive Finish |
|
39 |
Blindside |
|
40 |
Furor |
|
41 |
Shield Volley |
|
42 |
Focus Retaliation |
|
43 |
Titan Stomp |
|
44 |
Bulwark |
|
45 |
Reinforcement |
|
46 |
Enraged |
|
47 |
Fiery Resolve |
|
48 |
Heavy Hitter |
|
49 |
Collateral Damage |
|
50 |
Traumautize |
|
51 |
Breathing Room |
|
52 |
Grappling Spear |
|
53 |
Decisive Finish |
|
54 |
Sly Strike |
|
55 |
Arc of Destruction |
|
56 |
Harder Hits |
|
57 |
Double Edged |
|
58 |
Violent Catharsis |
|
59 |
Concentration |
|
60 |
Cleaving Strike |
|
61 |
Bloody Vengeance |
|
62 |
Wear and Tear |
|
63 |
Shieldbreaker |
|
64 |
Critical Power |
|
65 |
Arms Reach |
- Every ability node is an extra 15% passive damage so we want to grab as many abilities as possible even if we are not using them
Build Snapshot
Related Builds
Support the Website
Thank you for choosing RPGael!
RPGael is kept ad-free so you can enjoy builds without distractions. If you’d like to support the site, you can donate through Ko-fi or check out the RedGael YouTube channel. Every bit of support helps keeps new content coming!

